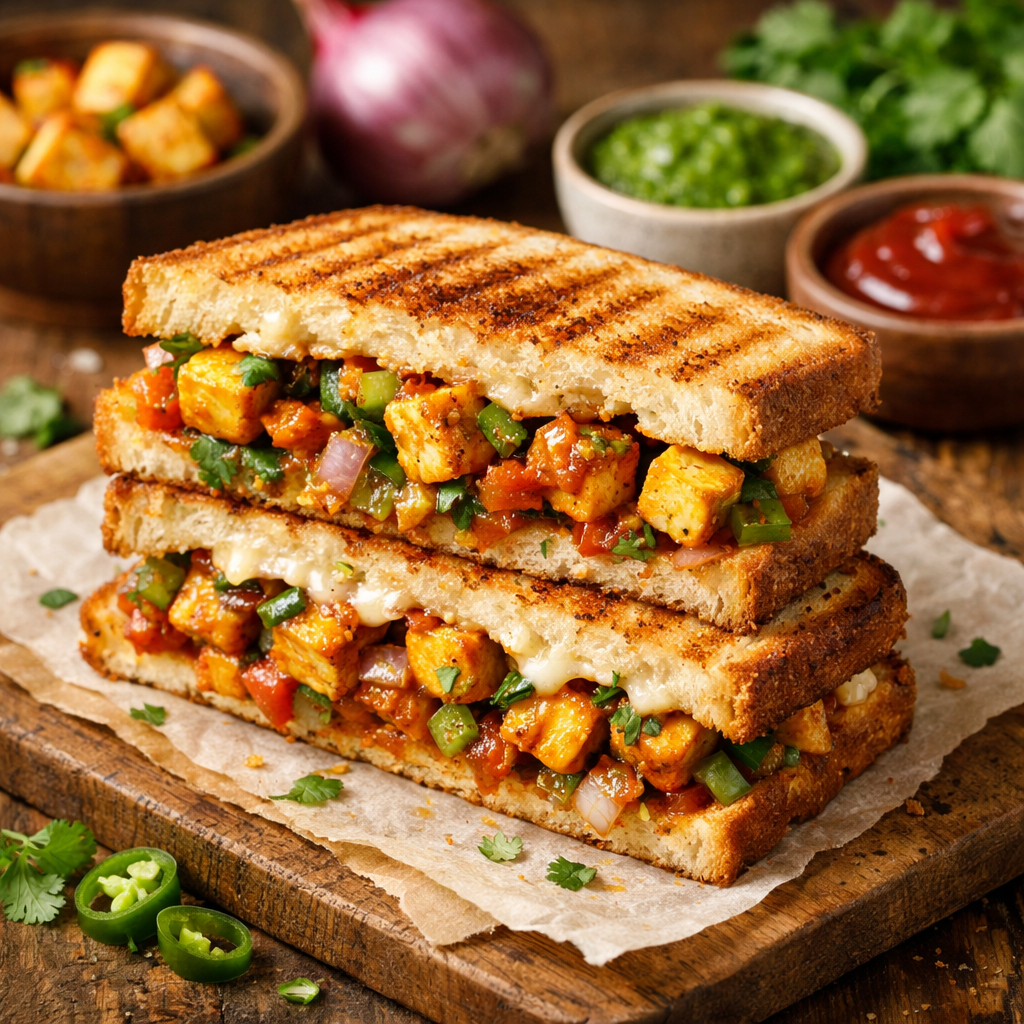
Ever bite into something so good you immediately want to make it again? That’s this paneer sandwich.
I’m talking about crispy bread, spiced paneer that’s got just the right amount of kick, and vegetables that actually taste like something.
This isn’t your sad desk lunch situation. This is the kind of sandwich that makes you look forward to lunch all morning.
And here’s the thing: paneer sandwiches are huge in India, but they don’t get nearly enough love elsewhere. Which is wild because they’re easier to make than most sandwiches and taste ten times better.
You can meal prep the filling, toast them fresh whenever hunger hits, and customize the spice level to match your mood.
Let me show you how to make them right.
What You’ll Need
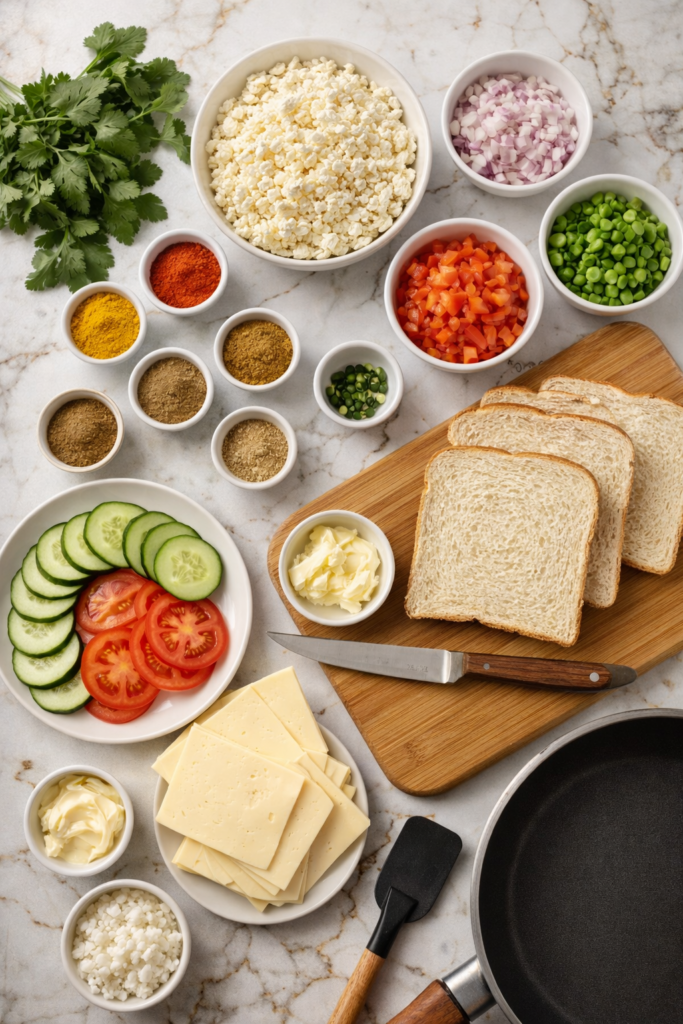
For the Paneer Filling:
- 200g paneer, crumbled or mashed
- 1 small onion, finely chopped
- 1 small tomato, finely chopped
- 1 small bell pepper (capsicum), finely chopped
- 2 green chilies, finely chopped
- 1/2 tsp turmeric powder
- 1/2 tsp red chili powder
- 1/2 tsp garam masala
- 1/2 tsp chaat masala
- 1/2 tsp cumin powder
- Salt to taste
- 2 tbsp fresh cilantro (coriander leaves), chopped
- 1 tbsp butter or oil
For the Sandwich:
- 8 slices of bread (white or whole wheat)
- 2-3 tbsp butter for toasting
- 1 small cucumber, thinly sliced
- 1 small tomato, thinly sliced
- Green chutney (optional but recommended)
- Cheese slices (optional)
For Green Chutney (optional):
- 1 cup fresh cilantro
- 1/2 cup fresh mint leaves
- 2 green chilies
- 1 tsp cumin seeds
- 1 tbsp lemon juice
- Salt to taste
- 2 tbsp water
Tools You’ll Need
You probably have all of these already:
- Non-stick pan or griddle
- Mixing bowl
- Spatula
- Knife and cutting board
- Blender (if making chutney)
- Sandwich press or panini maker (optional)
Pro Tips
Moisture is the enemy here. After you chop your tomatoes and any other wet vegetables, let them sit on paper towels for a few minutes. This pulls out excess water that would otherwise make your filling soggy and your bread a sad, wet mess.
Don’t skip the toasting step. Raw bread with the filling tastes fine, but toasted bread takes this sandwich from good to “why have I been making regular sandwiches my whole life?” The crunch matters.
Crumble your paneer, don’t cube it. Cubed paneer looks pretty but falls out of the sandwich when you bite into it. Crumbled paneer stays put and mixes better with the spices. You can mash it with a fork or just break it up with your hands.
Make the filling a day ahead if you want. It actually tastes better the next day because the spices have time to really get into the paneer. Just store it in an airtight container in the fridge and toast fresh sandwiches whenever you’re hungry.
Adjust the heat to your taste. The recipe calls for 2 green chilies, but you can use 1, 3, or none depending on your spice tolerance. The chaat masala and garam masala add flavor without much heat, so don’t skip those even if you’re going mild on the chilies.
How to Make Paneer Sandwich
Step 1: Make the Green Chutney (if using)
Throw the cilantro, mint, green chilies, cumin seeds, lemon juice, salt, and water into a blender.
Blend until smooth. You want it thick enough to spread but not paste-like. Add a little more water if needed.
Set it aside while you make the filling.
Step 2: Prepare the Paneer Filling
Heat the butter or oil in a non-stick pan over medium heat.
Add the chopped onions and sauté until they turn translucent. This takes about 2-3 minutes.
Toss in the green chilies and bell pepper. Cook for another 2 minutes until the bell pepper softens slightly but still has some crunch.
Add the chopped tomatoes and cook until they soften. You’ll see them breaking down and releasing their juices. This takes about 3-4 minutes.
Now add all your spices: turmeric, red chili powder, garam masala, chaat masala, and cumin powder. Stir everything together and let the spices cook for about a minute. Your kitchen will smell incredible right now.
Add the crumbled paneer and salt. Mix everything together really well so the paneer is coated in all those spices and vegetables.
Cook for 3-4 minutes, stirring occasionally. You want the paneer to soak up all the flavors.
Turn off the heat and stir in the fresh cilantro.
Let the filling cool down a bit before assembling your sandwiches. Hot filling makes the bread soggy.
Step 3: Assemble the Sandwiches
Lay out your bread slices on a clean surface.
If you’re using green chutney, spread a thin layer on one side of each bread slice. If you’re not using chutney, skip this step and let the spiced paneer shine on its own.
Take one slice and add a few cucumber slices and tomato slices (these are optional but add nice freshness).
Spoon about 2-3 tablespoons of the paneer filling onto the bread. Spread it evenly but don’t overstuff or your sandwich will fall apart.
If you want cheese, now’s the time to add a slice.
Top with another bread slice to complete the sandwich.
Step 4: Toast the Sandwiches
Heat a non-stick pan or griddle over medium heat.
Spread butter on the outside of both bread slices.
Place the sandwich on the hot pan and press down gently with a spatula.
Toast for 2-3 minutes until the bottom is golden brown and crispy.
Flip carefully and toast the other side for another 2-3 minutes.
If you’re using a sandwich press or panini maker, just butter the outside, place it in the press, and cook until golden and crispy on both sides.
Step 5: Serve
Cut the sandwich diagonally (it just tastes better that way, trust me).
Serve hot with ketchup, extra green chutney, or your favorite dipping sauce.
Substitutions and Variations
No paneer? Use firm tofu instead. Press it well to remove excess moisture, then crumble and use the same way. You can also use scrambled eggs for a completely different but equally delicious sandwich.
Different vegetables: This recipe is super flexible. You can add grated carrots, corn, peas, or chopped spinach to the filling. Just cook any vegetables that need it before adding the paneer.
Bread options: White bread is classic, but whole wheat works great too. Sourdough makes it fancy. Even pita bread or wraps work if you want to switch things up.
Spice swaps: Don’t have chaat masala? Use a little extra cumin and a squeeze of lemon juice. No garam masala? Use a tiny bit of cinnamon and cumin powder mixed together.
Make it vegan: Use crumbled firm tofu instead of paneer and vegan butter for toasting. Skip the cheese or use vegan cheese.
Protein boost: Add some cooked chickpeas or white beans to the filling for extra protein and texture.
Cheese lovers: Mix some shredded mozzarella or cheddar directly into the hot paneer filling. It gets all melty and amazing.
Make Ahead Tips
The paneer filling keeps in the fridge for up to 3 days in an airtight container.
Actually, it tastes even better the next day because the flavors have time to develop.
Just reheat it gently in a pan before assembling your sandwiches, or use it cold if you’re in a hurry.
The green chutney lasts about 5 days in the fridge. Make a big batch and use it on everything.
You can also freeze the paneer filling for up to a month. Thaw it in the fridge overnight and reheat before using.
Don’t assemble the sandwiches ahead of time though. The bread gets soggy. Always toast them fresh right before eating.
Nutritional Information (per sandwich)
- Calories: 285
- Protein: 12g
- Carbohydrates: 28g
- Fat: 14g
- Fiber: 3g
- Calcium: 180mg (from paneer)
Keep in mind this varies based on your bread choice and how much butter you use for toasting.
Meal Pairing Suggestions
This sandwich is filling enough to be a complete meal on its own, but if you want sides:
Soup: A bowl of tomato soup or lentil soup makes this feel like a proper lunch.
Chips: Kettle-cooked potato chips or vegetable chips add crunch.
Salad: A simple cucumber and onion salad with lemon juice balances the richness.
Drinks: Masala chai, mango lassi, or even just cold lemonade work perfectly.
Indian sides: Serve with papad (crispy lentil crackers) or pickle for an authentic touch.
Leftovers and Storage
Leftover filling: Store in an airtight container in the fridge for up to 3 days. Reheat in a pan over medium heat, adding a splash of water if it looks dry.
Leftover assembled sandwiches: These don’t keep well. The bread gets soggy and sad. Always better to store the filling separately and toast fresh sandwiches when you’re ready to eat.
Freezing: The paneer filling freezes well for up to a month. Thaw in the fridge overnight before using.
Reheating: If you have leftover toasted sandwiches (though I don’t know how that would happen), reheat them in a pan or toaster oven. Microwave makes them soggy.
FAQ
Can I use store-bought paneer?
Yes, absolutely. That’s what most people use and it works perfectly. Just crumble it well before adding to the filling.
Is paneer the same as cottage cheese?
Not quite. Paneer is firmer and doesn’t melt like cottage cheese. You could technically use cottage cheese in a pinch, but drain it really well first and expect a different texture.
Can I make this without a non-stick pan?
You can, but it’s trickier. Use a well-seasoned cast iron pan or a regular pan with plenty of butter or oil to prevent sticking.
How do I keep the filling from falling out?
Don’t overstuff the sandwich, and make sure to press down gently while toasting. The key is spreading the filling evenly rather than piling it in the center.
Can kids eat this?
For sure. Just reduce or skip the green chilies and go easy on the red chili powder. The other spices add flavor without heat.
What if I don’t have all the spices?
The turmeric, garam masala, and cumin are the most important ones. You can skip the chaat masala and red chili powder if needed, though the sandwich won’t have quite the same depth of flavor.
Can I air fry these?
Yes! Brush both sides with butter and air fry at 180°C (350°F) for 4-5 minutes, flipping halfway through.
How do I make the paneer less crumbly?
If your paneer is too crumbly, you can grate it instead and it’ll hold together better in the filling. Or mix in a tablespoon of cream or yogurt to help bind everything.
Wrapping Up
This paneer sandwich is one of those recipes that seems too simple to be special, but then you make it and realize it’s everything you want in a sandwich.
The spiced paneer brings all the flavor, the vegetables add freshness, and that crispy toasted bread ties it all together.
Make it for lunch this week and see what I mean.
And when you do, drop a comment below and let me know what you think. Did you add extra cheese? Go heavy on the chilies? Make any creative substitutions? I want to hear all about it.