You know that moment when you bite into restaurant-quality chicken and think “I could never make this at home”?
I’m about to prove you wrong.
This lemon chicken has crispy edges, tender meat, and a sauce that’s tangy enough to wake up your taste buds but not so sharp that your face puckers up like you just bit into a lemon wedge (because that would be awkward at the dinner table).
And here’s the thing: it comes together in about 30 minutes. No marinating overnight. No complicated techniques. Just chicken, a few pantry staples, and a pan.
I made this on a random Tuesday when I had zero motivation to cook, and my husband asked for the recipe three times during dinner. That’s when I knew it needed to be shared.
Let’s get into it.
What You’ll Need
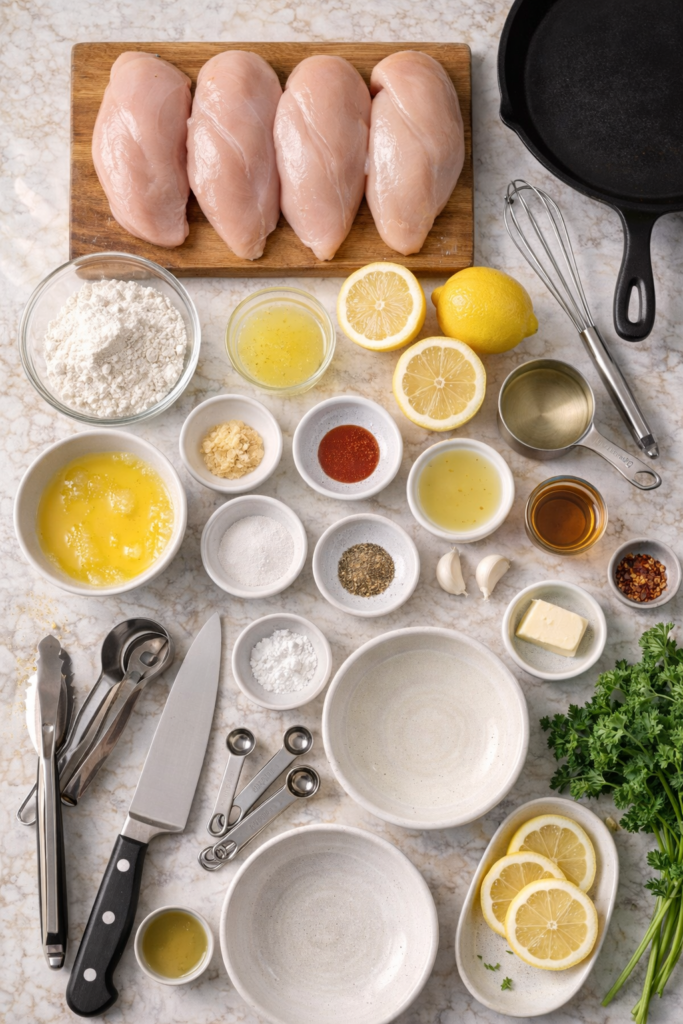
For the Chicken
- 1.5 lbs boneless, skinless chicken breasts (about 2-3 pieces)
- ½ cup all-purpose flour
- 1 teaspoon garlic powder
- 1 teaspoon onion powder
- ½ teaspoon paprika
- ½ teaspoon salt
- ¼ teaspoon black pepper
- 2 large eggs
- 3 tablespoons vegetable oil (for frying)
For the Lemon Sauce
- ⅓ cup fresh lemon juice (about 2-3 lemons)
- Zest of 1 lemon
- ¼ cup chicken broth
- 3 tablespoons honey
- 2 tablespoons soy sauce
- 2 cloves garlic, minced
- 1 tablespoon cornstarch
- 2 tablespoons water
- 1 tablespoon butter (optional, but makes it extra silky)
For Garnish
- Fresh parsley, chopped
- Lemon slices
- Red pepper flakes (if you like a little kick)
Tools You’ll Need
You probably already have these sitting in your kitchen:
- Large skillet (cast iron works great here)
- Two shallow bowls or plates
- Sharp knife
- Cutting board
- Whisk
- Measuring cups and spoons
- Tongs or a fork
- Small bowl for the cornstarch slurry
Pro Tips
Pound your chicken thin. This isn’t just about cooking time. Thinner pieces get crispier and cook more evenly. Put the chicken between two pieces of plastic wrap and give it a few good whacks with a rolling pin or meat mallet until it’s about ½ inch thick.
Don’t skip the cornstarch slurry. I know it seems like an extra step, but this is what makes the sauce glossy and thick enough to coat the chicken instead of just pooling at the bottom of your plate. Mix it right before you add it to the pan so it doesn’t get clumpy.
Use fresh lemon juice. Bottled lemon juice tastes flat and artificial. You need the brightness of fresh lemons here. Trust me, those two extra minutes of squeezing are worth it.
Let the chicken rest before slicing. I know you’re hungry, but give it 3-4 minutes. This keeps the juices inside instead of all over your cutting board.
Control your heat. Medium-high heat gets you golden, crispy chicken. Too high and you’ll burn the coating before the inside cooks. Too low and you’ll end up with sad, soggy chicken that no one wants to eat.
Substitutions and Variations

Chicken thighs instead of breasts? Go for it. They’re juicier and more forgiving if you overcook them slightly. Just adjust the cooking time by a minute or two.
No honey? Swap it with maple syrup or agave nectar. The flavor will be slightly different, but still delicious.
Gluten-free? Use cornstarch or rice flour instead of all-purpose flour for the coating.
Want it spicier? Add ½ teaspoon of red pepper flakes to the sauce or drizzle some sriracha on top before serving.
Low-sodium option? Use low-sodium soy sauce and reduce the added salt to ¼ teaspoon.
Dairy-free? Skip the butter at the end or use a plant-based alternative.
Make it orange chicken style. Replace half the lemon juice with orange juice and add a tablespoon of orange zest. Different citrus, same crispy deliciousness.
How to Make It
Step 1: Prep the chicken.
Trim any excess fat from the chicken breasts. Place them between two sheets of plastic wrap and pound them until they’re about ½ inch thick all around.
This makes such a difference. Thick pieces take forever to cook and the coating burns before the inside is done.
Cut the pounded chicken into bite-sized pieces, roughly 1.5 to 2 inches each.
Step 2: Set up your coating station.
In one shallow bowl, whisk together the flour, garlic powder, onion powder, paprika, salt, and pepper.
In another bowl, beat the eggs until they’re well combined and slightly frothy.
Line these up next to your stove so you’re not doing the awkward chicken-hands dance across the kitchen.
Step 3: Coat the chicken.
Pat the chicken pieces dry with paper towels. This helps the coating stick better.
Dredge each piece in the flour mixture first, shaking off any excess. Then dip it into the beaten eggs, letting the extra drip off. Finally, toss it back into the flour mixture for a second coat.
This double-dredge method is the secret to getting that restaurant-style crispy coating.
Place the coated pieces on a plate while you heat up your pan.
Step 4: Fry the chicken.
Heat the vegetable oil in a large skillet over medium-high heat. You want it hot enough that a small piece of chicken sizzles immediately when you add it.
Working in batches if needed (don’t overcrowd the pan), add the chicken pieces in a single layer. Cook for 3-4 minutes on the first side without moving them. Resist the urge to flip them early.
Flip and cook another 3-4 minutes on the other side until golden brown and cooked through. The internal temperature should hit 165°F if you want to be precise about it.
Transfer the cooked chicken to a paper towel-lined plate.
Step 5: Make the sauce.
In the same pan (don’t clean it, those brown bits are flavor), reduce the heat to medium-low.
Add the lemon juice, lemon zest, chicken broth, honey, soy sauce, and minced garlic. Stir everything together and let it simmer for about 2 minutes.
In a small bowl, mix the cornstarch and water until smooth. Pour this into the sauce while whisking constantly.
The sauce will thicken up in about 30 seconds. Once it’s glossy and coats the back of a spoon, remove the pan from heat.
Stir in the butter if you’re using it. This adds a silky richness that makes the sauce cling to the chicken even better.
Step 6: Bring it all together.
Add the crispy chicken pieces back into the pan with the sauce. Toss gently to coat each piece.
You want to do this quickly so the coating doesn’t get soggy. About 30 seconds of tossing is perfect.
Step 7: Serve.
Transfer everything to a serving plate. Garnish with fresh parsley, lemon slices, and a sprinkle of red pepper flakes if you want some heat.
Serve immediately while the chicken is still crispy and the sauce is warm.
Perfect Pairings
This lemon chicken plays well with so many sides.
White rice is classic for a reason. It soaks up all that sauce and balances out the tanginess.
Steamed broccoli or green beans add color and nutrition without competing with the flavors.
Fried rice turns this into a full takeout-style meal. The combo is unbeatable.
Cauliflower rice if you’re going low-carb. Still delicious, just lighter.
A simple salad with a sesame ginger dressing keeps things fresh and crisp.
Garlic noodles for when you want something extra indulgent.
Make Ahead Tips
You can prep the chicken pieces and get them coated up to 4 hours ahead. Just store them in the fridge on a plate covered with plastic wrap.
The sauce can be made a day in advance. Keep it in an airtight container in the fridge and reheat it gently when you’re ready to serve.
Don’t fry the chicken ahead of time if you want it crispy. It loses that crunch pretty quickly once it sits.
Leftovers and Storage
Store any leftover chicken in an airtight container in the fridge for up to 3 days.
Reheat it in a 375°F oven for about 10 minutes to get some of that crispiness back. The microwave works if you’re in a rush, but it won’t be as good.
The sauce can be stored separately for up to 5 days. Just give it a good stir before reheating since the cornstarch might settle.
I don’t recommend freezing this one. The coating gets weird and soggy when you thaw it out.
FAQ
Can I use chicken thighs instead of breasts?
Yes! Thighs are juicier and more forgiving. Just make sure they’re boneless and skinless, and adjust the cooking time by a minute or two since they’re slightly thicker.
Why is my coating falling off?
Usually this happens when the chicken is too wet before coating or the oil isn’t hot enough. Pat the chicken completely dry and make sure the oil is sizzling before you add the pieces.
Can I bake this instead of frying?
You can, but it won’t be as crispy. If you want to try it, place the coated chicken on a wire rack over a baking sheet, spray with cooking oil, and bake at 425°F for about 20 minutes, flipping halfway through.
How do I know when the chicken is done?
The outside should be golden brown and the inside should register 165°F on a meat thermometer. If you don’t have a thermometer, cut into the thickest piece and make sure there’s no pink inside.
Can I make this ahead for meal prep?
The sauce reheats beautifully, but the chicken loses its crispiness. If you’re meal prepping, I’d recommend storing the chicken and sauce separately and reheating the chicken in the oven to crisp it back up.
What if I don’t have fresh lemons?
Fresh is always best, but if you’re in a pinch, bottled lemon juice works. You’ll need about ⅓ cup. Just know the flavor won’t be quite as bright.
Is there a way to make this less messy?
Use one hand for the dry ingredients and one hand for the wet. This keeps you from getting that thick, gloppy coating on both hands. Also, line your workspace with parchment paper for easy cleanup.
Can I double this recipe?
Absolutely. Just work in batches when frying so you don’t overcrowd the pan. Overcrowding drops the oil temperature and you end up with soggy chicken instead of crispy.
Wrapping Up
This lemon chicken has become one of those recipes I make when I need something that feels special but doesn’t require me to spend hours in the kitchen.
It’s crispy. It’s tangy. It’s satisfying in a way that makes you want to lick the plate when no one’s looking (no judgment here).
Give it a try this week and let me know how it turns out in the comments below. Did you add any fun twists? Serve it with something unexpected? I want to hear all about it.
Now go make some seriously good chicken. 🍋