You know that dip at parties that gets destroyed before the main courses even hit the table? The one where people come back for thirds without realizing it?
This is that dip.
I’ve been making creamy artichoke dip for years, and I’m convinced it’s one of those recipes that feels way more complicated than it actually is. The thing is, people taste this and think you spent hours on it. Really, you’re just throwing quality ingredients together and letting the oven do the heavy lifting.
The first time I made this, I doubled the recipe thinking I was being smart. By the time people left, there were maybe two spoonfuls left in the baking dish. I’m not exaggerating—it was gone.
Here’s what makes this version work: fresh artichoke hearts (not the jarred ones swimming in brine), real cream cheese, good parmesan, and a touch of garlic that doesn’t overpower everything. It’s tangy, creamy, and has this satisfying richness that keeps people coming back.
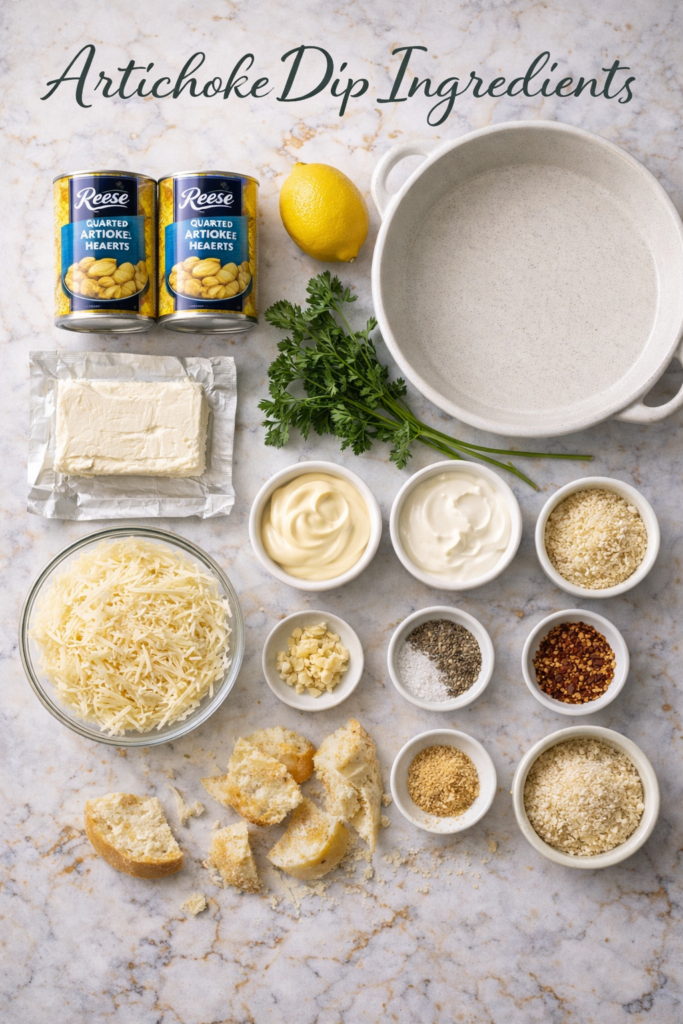
What You’ll Need
Fresh Ingredients
- 2 cans (14 oz each) artichoke hearts in water, drained and chopped
- 8 oz cream cheese, softened to room temperature
- 1/2 cup grated parmesan cheese
- 1/3 cup mayonnaise
- 1/4 cup sour cream
- 3 cloves garlic, minced
- 1/2 cup shredded mozzarella cheese
- 2 tablespoons fresh lemon juice
- 1 teaspoon salt
- 1/2 teaspoon black pepper
- 1/4 teaspoon red pepper flakes (optional, for a tiny kick)
- 2 tablespoons fresh parsley, chopped (for garnish)
- 1 tablespoon panko breadcrumbs (for topping, optional)
Tools You’ll Need
- 9-inch round baking dish or small cast iron skillet
- Large mixing bowl
- Wooden spoon or rubber spatula
- Measuring cups and spoons
- Knife for chopping
- Cutting board
- Oven
Pro Tips
Drain your artichokes really well. Seriously. If you skip this, your dip becomes watery and sad. I squeeze mine with paper towels to get extra moisture out.
Room temperature cream cheese is non-negotiable. Cold cream cheese will create lumps and you’ll spend forever trying to smooth it out. Let it sit on the counter for 20 minutes before you start.
Toast your garlic in a dry pan for 30 seconds. This mellows it out and prevents that raw, aggressive garlic bite. You want flavor, not a vampire repellent.
Don’t skip the lemon juice. It adds brightness and balances the richness. Without it, the dip feels heavy.
Use fresh parmesan if you can. The pre-shredded stuff has additives that prevent melting. Fresh parmesan creates a better texture.
Substitutions & Variations
Can’t find fresh artichokes? Frozen ones work great too. Thaw them completely and pat them dry.
Not a mayo person? Swap it for Greek yogurt. You’ll lose a tiny bit of richness, but it’s still delicious.
Want it spicier? Add more red pepper flakes or a pinch of cayenne. Some people love a jalapeño dip instead.
Going vegetarian? This recipe already is. If you want to add protein, mix in some crumbled feta or sun-dried tomatoes.
Dairy-free version? Use vegan cream cheese and cashew cream instead of sour cream. It’s not exactly the same, but it’s solid.
Make Ahead Tips
You can mix everything together up to 24 hours before baking. Just cover it and refrigerate. When you’re ready to serve, bake straight from the fridge. Add 5 extra minutes to the cooking time since it’ll be cold.
You can also freeze the unbaked dip in your baking dish. Wrap it tightly and freeze for up to 3 months. Thaw in the fridge overnight before baking.
Instructions
Step 1: Prep Your Artichokes
Drain your canned artichokes and pat them dry with paper towels. This step is crucial—extra moisture is your enemy. I usually let them sit in a colander for a minute, then go through with paper towels again.
Chop them into bite-sized pieces. You want them visible in the finished dip, not pulverized into nothing. Think roughly the size of a pea or chickpea. This gives the dip texture and makes people realize they’re eating actual artichokes, not just creamy paste.
Step 2: Get Your Cream Cheese Ready
Make sure your cream cheese is soft. If it’s still cold, it won’t blend smoothly and you’ll end up with annoying chunks throughout. Nobody wants that.
Pro move: Cut the cream cheese into smaller chunks before stirring. This helps it incorporate faster and more evenly. Room temperature is really the difference between this taking 2 minutes or 10 minutes to mix together.
Step 3: Mix the Base
In your mixing bowl, combine the softened cream cheese, sour cream, and mayonnaise. Stir until smooth and creamy. This is your foundation.
Don’t use an electric mixer here. A wooden spoon and some patience work better. You want to build the mixture gradually rather than whipping air into it.
This is where the magic starts. The sour cream adds tang, the mayo adds richness, and the cream cheese is basically the glue holding everything together. Each ingredient serves a purpose.
Step 4: Add the Cheese & Garlic
Stir in the parmesan, mozzarella, and minced garlic. Mix until everything is distributed evenly. This is where the richness really comes in.
The parmesan adds saltiness and that aged cheese flavor. The mozzarella melts and creates stretchy, creamy pockets throughout. The garlic, now that it’s been tempered in the pan, adds depth without aggression.
Take your time here. Make sure the garlic isn’t clumped in one spot.
Step 5: Fold in the Artichokes
Gently fold the chopped artichokes into the mixture along with the lemon juice, salt, pepper, and red pepper flakes if you’re using them.
This is where “fold” actually matters. You’re not trying to thoroughly blend. You’re incorporating while keeping the artichoke pieces intact. The goal is artichokes throughout, not mashed into oblivion.
The lemon juice is doing important work here—it’s cutting through the richness and keeping everything from feeling heavy. Without it, this dip tips from “wow” to “I need water.”
Step 6: Transfer to Your Baking Dish
Spread the dip into your baking dish evenly. If you’re using a cast iron skillet, it looks incredible and keeps things warm longer, which is a bonus.
Top with the panko breadcrumbs if you want extra crunch. This creates texture contrast. Some people skip it, but I love that little bit of crispness on top against the creamy inside.
Step 7: Bake
Bake at 375°F for 20-25 minutes. You’re looking for bubbling around the edges and a lightly golden top. The center should jiggle slightly when you shake the pan.
If your oven runs hot, start checking at 18 minutes. If it runs cool, go the full 25. Every oven is different and this is worth paying attention to.
What you’re not looking for: a brown, crusty top. That means it’s been in too long and the edges are starting to dry out. You want golden and bubbling, not burnt.
Step 8: Finish with Fresh Herbs
Pull it out of the oven and sprinkle the fresh parsley on top immediately. This adds color and a fresh brightness that balances the richness.
Fresh herbs at the end always make food look like you know what you’re doing. It’s a simple finishing touch that elevates everything.
Step 9: Let It Cool for 2 Minutes
I know it’s torture waiting, but letting it sit briefly prevents people from burning their mouths. Plus, it sets up just enough to scoop cleanly.
Use a sturdy dip spoon or small wooden spoon. This dip is meant to be eaten with something—crackers, bread, vegetables—so you want bites that hold together.

Meal Pairing Suggestions
Bread: Crusty sourdough, crostini, focaccia, or garlic bread are all perfect.
Crackers: Rosemary water crackers, sea salt, or even simple salted crackers work beautifully.
Vegetables: Serve with bell pepper slices, celery, cherry tomatoes, or cucumber rounds if you want something lighter.
Party Context: This dip shines as an appetizer before a nice dinner. It’s rich enough to feel special, but light enough that people still have room for the main course.
Leftovers & Storage
Store leftovers in an airtight container in the fridge for up to 4 days. Reheat in a 350°F oven for 10 minutes or in the microwave for 1-2 minutes.
This dip actually tastes better the next day once all the flavors meld together. I’ve been known to eat cold spoonfuls straight from the container the morning after a dinner party. No shame.
Frequently Asked Questions
Can I make this in a slow cooker? Yes, absolutely. Mix everything together, transfer to the slow cooker, and keep it on warm. It’ll stay creamy and ready to serve for hours. Just stir it occasionally.
What if my dip looks watery? Usually this means your artichokes weren’t drained well enough or you used ones packed in too much liquid. If this happens after baking, you can stir in a tablespoon of cream cheese to thicken it up.
Can I double this recipe? Totally. Just use a larger baking dish and add 5 minutes to the cooking time.
Is this dip healthy? It’s rich and indulgent, so it’s more of a special occasion thing than an everyday snack. That said, artichokes are packed with fiber and antioxidants, so there’s that.
Can I use fresh artichokes instead of canned? You’d need about 1.5 pounds of fresh artichokes. Boil them until tender, remove the leaves and scoop out the fuzzy choke part, then chop the hearts. It’s doable but more work.
Why is mine brown on top but cold inside? Your oven might run hot. Cover it with foil for the first 15 minutes of baking, then remove the foil to let it brown for the last 10 minutes.
Can I add spinach to this? Yes. Artichoke and spinach is a classic combination. Add about 1 cup of frozen spinach (thawed and squeezed dry) to the mixture.
Wrapping Up
This artichoke dip is one of those recipes that feels fancy but requires zero fancy skills. It’s the kind of thing you make when you want to impress people without actually stressing out.
The best part is watching people’s faces when they taste it and realize how good it is. Then watching them come back for more. And more. Until it’s gone.
Make this for your next dinner party, game night, or honestly just because you’re craving something creamy and delicious. People will ask for the recipe. They always do.
Have you made this before? Leave a comment below and let me know how it turned out. Did you add anything different? Burn the edges? Find the perfect cracker pairing? I want to hear about it.