Prep time: 30 min | Cook time: 30 min | Total: ~1 hr | Makes: 20–22 coxinhas | Difficulty: Intermediate
I ate around a hundred of these when I was in Brazil. And I’m barely exaggerating.
Coxinha is one of those foods that sounds simple on paper — deep-fried dough stuffed with spiced shredded chicken — but the moment you bite into one, you kind of lose your mind a little. The outside is perfectly golden and crispy. The inside is soft, slightly mashed-potato-like (I know, it sounds weird but trust me on this), and packed with flavor.
Every street corner, every bakery, every little snack bar in Brazil had them. And every single time, I thought “okay, one more and then I’ll stop.” Spoiler: I never stopped.
The good news? You can make them at home, and they’re a lot more doable than you’d think.
Here’s everything you need to know. 👇
What You’ll Need
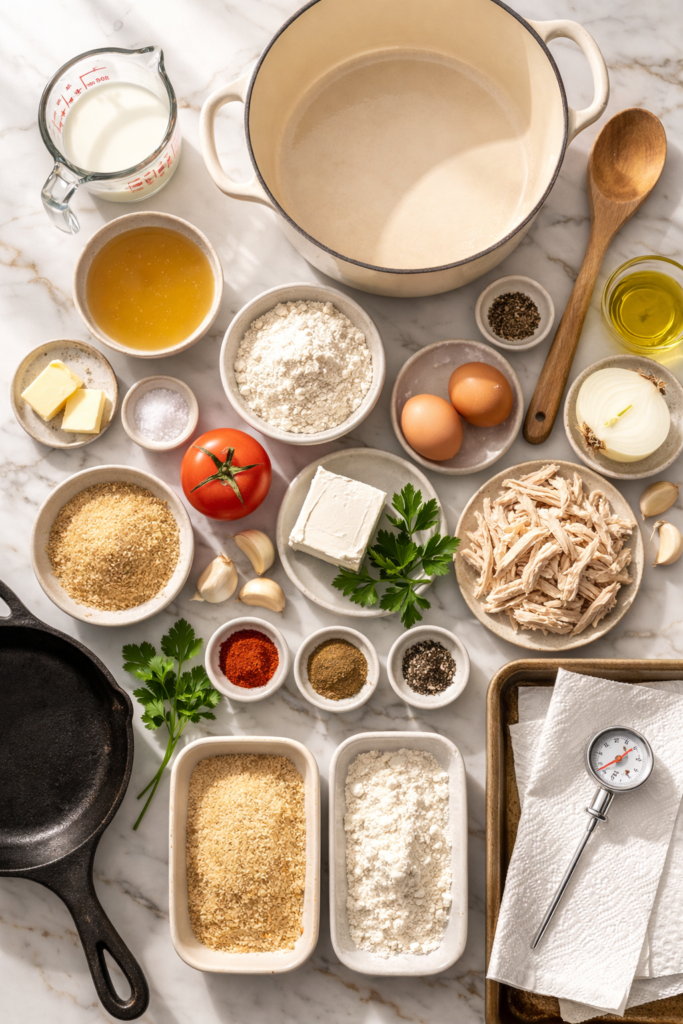
For the Dough
- 2 cups (480ml) whole milk
- 2 cups (480ml) chicken broth
- 2 tablespoons unsalted butter
- 1 teaspoon salt
- 3 cups (375g) all-purpose flour, sifted
For the Chicken Filling
- 2 cups (about 300g) shredded cooked chicken (rotisserie works great)
- 1 tablespoon olive oil
- ½ medium white onion, finely diced
- 3 garlic cloves, minced
- 1 medium tomato, finely chopped and deseeded
- 4 oz (115g) cream cheese, softened
- 2 tablespoons fresh flat-leaf parsley, chopped
- ½ teaspoon smoked paprika
- ½ teaspoon ground cumin
- Salt and black pepper, to taste
For Breading & Frying
- 2 large eggs, beaten
- 2 cups (220g) plain breadcrumbs (fine, not panko)
- 4–5 cups (960ml–1.2L) vegetable oil, for frying
Tools You’ll Need
- Large heavy-bottomed saucepan or Dutch oven (for dough and frying)
- Wooden spoon or silicone spatula
- Skillet or frying pan (for the filling)
- Mixing bowls (at least 2)
- Kitchen thermometer (for oil temperature — don’t skip this)
- Baking sheet lined with paper towels
- Shallow dishes for the egg and breadcrumb stations
- Fork or stand mixer (optional, for cooling the dough faster)
How to Make Coxinha
Step 1: Make the Filling
Heat the olive oil in a skillet over medium heat. Add the diced onion and cook for about 3 minutes until soft and translucent. Add the garlic and stir for another 30 seconds.
Add the chopped tomato and cook until most of the liquid evaporates, about 4–5 minutes. Stir in the shredded chicken, smoked paprika, cumin, salt, and pepper. Cook for 2 more minutes, then remove from heat.
Fold in the cream cheese and fresh parsley until everything is combined and creamy. Set aside to cool. The filling needs to be fully cooled before you use it, otherwise it makes shaping a nightmare.
Step 2: Make the Dough
In a large saucepan, combine the milk, chicken broth, butter, and salt. Bring to a gentle boil over medium heat, stirring occasionally.
Once it’s boiling, reduce the heat to low and add all the flour at once. Stir vigorously with a wooden spoon until a smooth dough forms and pulls away from the sides of the pan. This takes about 3–4 minutes of constant stirring. It should look like a thick, slightly sticky dough ball.
Transfer the dough to a clean surface or bowl and let it cool until it’s comfortable to handle. You can press it out a bit to speed this up. Don’t try to shape it while it’s hot — you’ll burn your hands and the coxinhas won’t hold their shape.
Step 3: Shape the Coxinhas
Lightly grease your hands with a tiny bit of oil. Pinch off a golf-ball-sized piece of dough (about 50g). Flatten it in your palm into a circle about 3–4 inches wide.
Place a heaping teaspoon of filling in the center. Bring the edges up around the filling and gently pinch them closed at the top, then roll it into a teardrop shape — pointed at the top, round at the bottom. This is the signature coxinha shape.
Repeat with the remaining dough and filling. Place the shaped coxinhas on a tray as you go.
Step 4: Bread Them
Set up two shallow dishes — one with the beaten egg, one with the breadcrumbs.
Dip each coxinha in the egg, letting any excess drip off, then roll it in the breadcrumbs until fully coated. Press gently so the crumbs stick well. Set back on the tray.
Step 5: Fry
Heat the oil in your Dutch oven or deep saucepan to 350°F (175°C). Use a thermometer — if the oil is too hot, they burn before the inside heats through. Too cool, and they absorb oil and get soggy.
Fry in batches of 4–5 at a time, turning gently, until they’re deep golden brown all over — about 3–4 minutes per batch. Don’t crowd the pan.
Transfer to the paper towel-lined tray and let them drain for a minute or two. Then eat one immediately, because that’s just the rule.

Pro Tips
1. Use rotisserie chicken. Leftover rotisserie chicken is perfect here. It’s already seasoned, already tender, and it cuts your prep time in half. Just shred and go.
2. Cool everything before shaping. This is probably the most common mistake. If either the dough or filling is still warm, the coxinhas will crack when you shape them and fall apart in the oil. Patience here = much better results.
3. Don’t skip the cream cheese. Some recipes use catupiry (a Brazilian cream cheese) which you can find online or in Latin grocery stores. It’s richer and tangier than regular cream cheese, and if you can get it, use it. But regular cream cheese works really well too.
4. Keep your hands lightly oiled. The dough gets sticky. A tiny bit of oil on your palms every few pieces keeps the shaping smooth and stress-free.
5. Maintain your oil temperature. Let the oil come back up to 350°F between each batch. Frying at a consistent temperature gives you that perfect golden crust every time.
Substitutions & Variations
| If you want to… | Try this |
|---|---|
| Make it dairy-free | Swap butter for vegan butter, use oat milk in the dough, and use dairy-free cream cheese in the filling |
| Add more heat | Add ½ teaspoon of red chili flakes or diced jalapeño to the filling |
| Try a different protein | Use shredded pulled pork, ground beef, or even flaked white fish |
| Make it vegetarian | Use a filling of sautéed mushrooms, corn, and cream cheese. Add a pinch of smoked paprika for depth |
| Use authentic catupiry | Swap the cream cheese 1:1 with catupiry cheese (found in Brazilian or Latin grocery stores) |
| Bake instead of fry | Bake at 400°F (200°C) for 25–30 minutes, flipping halfway. They won’t be quite as crispy but still really good |
Make Ahead Tips
These are genuinely great for making ahead. Here are a couple of ways to do it:
- Freeze before frying: Shape and bread the coxinhas, then lay them on a baking sheet and freeze until solid (about 2 hours). Transfer to a freezer bag. They keep for up to 3 months. Fry straight from frozen — just add 1–2 extra minutes to the cook time.
- Make the filling ahead: The chicken filling can be made up to 2 days ahead and kept in the fridge. Just assemble and fry when you’re ready.
Meal Pairing & Serving Ideas
In Brazil, coxinhas are mostly eaten as a snack — at bakeries, parties, or literally just handed to you in a paper bag on a street corner. They’re perfect as-is.
But if you want to make a full spread of it:
- Serve alongside a sweet chili dipping sauce or a garlic aioli
- Pair with limonada suíca (Brazilian lemonade) for a full Brazilian snack night
- Serve as an appetizer before feijoada or moqueca for a full Brazilian dinner
Nutritional Breakdown
Per coxinha (approximate, based on 22 pieces, using vegetable oil frying):
| Nutrient | Amount |
|---|---|
| Calories | ~185 kcal |
| Protein | ~8g |
| Carbohydrates | ~21g |
| Fat | ~8g |
| Saturated Fat | ~2.5g |
| Sodium | ~280mg |
Fun fact: coxinha literally translates to “little thigh” in Portuguese, named after the shape they’re meant to resemble (a chicken drumstick). The fact that they taste nothing like a drumstick and everything like the most addictive thing you’ve ever eaten is a happy bonus. 😄
Leftovers & Storage
- Fridge: Store in an airtight container for up to 3 days.
- Reheat: The oven or an air fryer at 375°F (190°C) for 8–10 minutes brings them back almost exactly as good as fresh. Avoid the microwave — they go soft and a bit sad.
- Freezer (after frying): Freeze in a single layer, then transfer to a bag. Good for up to 2 months. Reheat from frozen in the oven at 400°F for 15–18 minutes.
FAQ
Can I make these without a thermometer?
You technically can, but a thermometer makes life much easier. To test without one, drop a small piece of dough into the oil. If it sizzles immediately and floats to the top, you’re in the right range. If it sinks and sits there, the oil isn’t hot enough yet. If it browns in under 30 seconds, it’s too hot.
My dough cracked when I was shaping it. What happened?
A few possible reasons: the dough cooled too much and became stiff, or the filling was too wet and made the dough slide. If it’s cracking, wet your hands slightly with water (not oil) and work the dough gently to soften it. A small crack is fine — just pinch it closed. If it’s falling apart, the dough may need a splash more milk kneaded in.
Can I use bread flour instead of all-purpose?
Stick with all-purpose. Bread flour has higher protein content which will make the dough too elastic and tough for coxinha.
Do I have to use chicken?
Not at all. Coxinha is traditionally chicken, but plenty of Brazilian recipes use shredded beef or pork. A vegetarian version with mushroom and cheese filling is also completely valid and really tasty.
What’s catupiry and do I actually need it?
Catupiry is a soft, spreadable Brazilian cream cheese. It’s richer and slightly tangier than American cream cheese and makes the filling extra creamy. You can find it in Latin grocery stores or order it online. If you can get it, it does make a noticeable difference. But cream cheese is a solid substitute and most people outside of Brazil use it.
Can I air fry instead of deep fry?
Yes. Spray with oil and air fry at 380°F (193°C) for 12–14 minutes, flipping halfway through. The crust won’t be quite as crunchy as the deep-fried version, but it’s still really good and cuts back on oil significantly.
Wrapping Up
Coxinha is the kind of food that makes you rethink everything you thought you knew about snacks.
Once you’ve made a batch, you’ll understand why Brazilians eat these constantly. That crispy golden shell, that creamy chicken filling, that weirdly perfect mashed-potato-like dough — it’s hard to explain until you’ve had one. And once you have, you’ll just want more.
Make a big batch. Freeze some for later. Invite a few people over or keep them entirely to yourself. No judgment either way.
And if you end up tweaking the filling or trying a different variation, I want to hear about it. Drop a comment below and tell me how they turned out — and any questions are totally welcome. 👇