I’ve been making blueberry muffins for years, and I can tell you right now: most recipes get it wrong.
They’re either too dense, too dry, or the blueberries sink straight to the bottom like tiny purple anchors.
This recipe? It’s none of those things.
These muffins are tall, fluffy, and bursting with juicy blueberries in every single bite. The tops get this beautiful golden dome with just the right amount of crunch from the sugar topping.
I make these at least twice a month, and they disappear within hours. My husband literally hides one in the back of the pantry so he can have it the next day.
That’s how good they are.
What You’ll Need
For the Muffins:
- 2 cups all-purpose flour
- ¾ cup granulated sugar
- 2 ½ teaspoons baking powder
- ½ teaspoon salt
- ⅓ cup vegetable oil (or melted coconut oil)
- 1 large egg
- 1 cup whole milk (room temperature)
- 1 ½ teaspoons vanilla extract
- 1 ½ cups fresh or frozen blueberries
For the Topping:
- 2 tablespoons granulated sugar
- ¼ teaspoon cinnamon (optional)
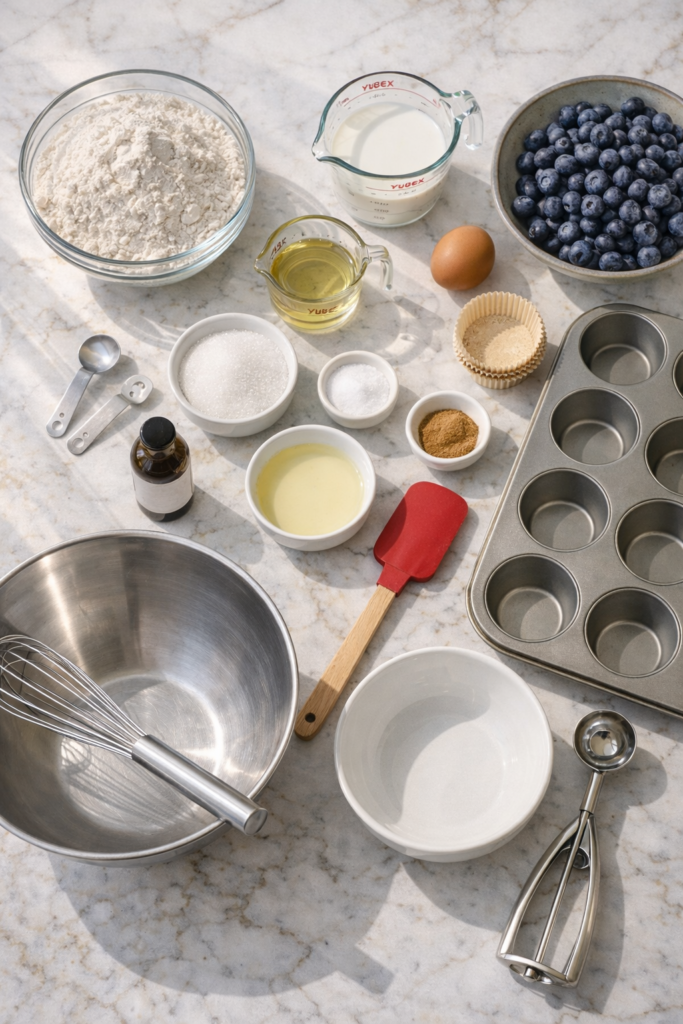
Tools You’ll Need
- Muffin tin (standard 12-cup)
- Paper muffin liners
- Two mixing bowls (one large, one medium)
- Whisk
- Rubber spatula
- Small bowl (for coating blueberries)
- Ice cream scoop or ¼ cup measure
Pro Tips
Coat your blueberries. Toss them in 1 tablespoon of flour before folding them into the batter. This keeps them from sinking and helps distribute them evenly.
Don’t overmix the batter. I know it’s tempting to get every last lump out, but those lumps are your friend. Overmixing = tough, dense muffins. Mix until you barely see streaks of flour and stop.
Fill those cups to the top. I’m serious about this. If you want bakery-style tall muffins with gorgeous domed tops, fill each liner almost completely full. Don’t be shy.
Start with high heat. Baking at 425°F for the first 5 minutes gives you that signature muffin top, then you drop it down to finish baking. It’s a game changer.
Use room temperature ingredients. Cold milk + cold eggs = flat muffins. Let everything sit on the counter for 30 minutes before you start.
How to Make Blueberry Muffins
Step 1: Prep everything
Preheat your oven to 425°F. Line your muffin tin with paper liners.
If you’re using frozen blueberries, don’t thaw them. Seriously. Frozen works better because they won’t bleed as much into the batter.
Step 2: Mix the dry ingredients
In your large bowl, whisk together the flour, sugar, baking powder, and salt. Make sure there are no clumps.
Set this aside.

Step 3: Combine the wet ingredients
In your medium bowl, whisk together the oil, egg, milk, and vanilla until everything is smooth and combined.
The mixture should look pale yellow and slightly frothy.
Step 4: Bring it together
Pour the wet ingredients into the dry ingredients.
Use your rubber spatula to fold everything together. This is where you need to resist the urge to overmix.
Stop when you still see a few flour streaks. The batter will be thick and lumpy. That’s exactly what you want.
Step 5: Add the blueberries
In a small bowl, toss your blueberries with 1 tablespoon of flour. This coats them and prevents sinking.
Gently fold the blueberries into the batter. Be careful not to crush them.
Step 6: Fill the muffin cups
Using an ice cream scoop or measuring cup, divide the batter evenly among the 12 muffin cups.
Fill them almost to the top. Like, really full. This is how you get those tall, bakery-style muffins.
Step 7: Add the topping
Mix the 2 tablespoons of sugar with cinnamon (if using).
Sprinkle generously over the top of each muffin. Don’t skip this. It creates the most amazing crunchy top.
Step 8: Bake
Put the muffin tin in the oven at 425°F and bake for 5 minutes.
After 5 minutes, reduce the temperature to 375°F without opening the oven door.
Bake for another 13-15 minutes, until the tops are golden brown and a toothpick inserted in the center comes out clean or with just a few moist crumbs.
Step 9: Cool
Let the muffins cool in the pan for 5 minutes.
Then transfer them to a wire rack. They’ll be tender and might fall apart if you move them too soon.
Try to wait at least 10 minutes before eating one. I know it’s hard.
Substitutions and Variations
Milk: You can use any milk you have. Whole milk gives you the richest, most tender muffins, but 2%, oat milk, or almond milk all work fine.
Oil: Swap with melted butter for a more buttery flavor, or use melted coconut oil if you want a subtle coconut taste.
Blueberries: Raspberries, blackberries, or chopped strawberries work just as well. You can also do a mixed berry version.
Sugar: Swap half the granulated sugar for brown sugar if you want a deeper, more caramel-like flavor.
Make them lemon blueberry: Add 1 tablespoon of lemon zest to the batter and replace ½ teaspoon of vanilla with lemon extract.
Add a streusel topping: Skip the sugar-cinnamon topping and make a quick streusel with ¼ cup flour, ¼ cup brown sugar, 2 tablespoons cold butter, and a pinch of cinnamon. Sprinkle it on before baking.
Make Ahead Tips
You can prep the dry ingredients up to a week in advance. Store them in an airtight container.
The night before, measure out your wet ingredients and keep them in the fridge in a sealed jar. Just bring everything to room temperature in the morning before mixing.
You can also freeze the baked muffins for up to 3 months. Let them cool completely, wrap each one individually in plastic wrap, and store in a freezer bag.
To reheat, microwave for 30-45 seconds or pop them in a 350°F oven for 10 minutes.
Nutritional Information (Per Muffin)
- Calories: 195
- Total Fat: 7g
- Saturated Fat: 1g
- Cholesterol: 18mg
- Sodium: 185mg
- Total Carbohydrates: 31g
- Dietary Fiber: 1g
- Sugars: 15g
- Protein: 3g
Leftovers and Storage
Store leftover muffins in an airtight container at room temperature for up to 3 days.
They’re best on day one, but they’re still really good on days two and three. Just pop them in the microwave for 15-20 seconds to bring back that fresh-baked feeling.
If you want them to last longer, refrigerate them for up to a week. The texture changes slightly (they get a bit denser), but they’re still delicious.
For longer storage, freeze them. Wrap each muffin individually in plastic wrap, then place them all in a freezer-safe bag. They’ll keep for up to 3 months.
When you’re ready to eat one, just thaw it at room temperature for an hour or microwave it straight from frozen for 45-60 seconds.
Frequently Asked Questions
Can I use frozen blueberries?
Yes! In fact, frozen blueberries work great because they don’t bleed into the batter as much. Don’t thaw them first, just toss them frozen into the batter.
Why did my blueberries sink to the bottom?
This usually happens when the batter is too thin or the blueberries aren’t coated in flour. Make sure you toss them in a tablespoon of flour before folding them in, and don’t add extra liquid to the batter.
Can I make mini muffins instead?
Absolutely. Fill mini muffin cups ⅔ full and bake at 375°F for 10-12 minutes. This recipe makes about 36 mini muffins.
How do I get that bakery-style muffin top?
Three things: fill the cups really full, start baking at a high temperature (425°F), and make sure your baking powder is fresh. Old baking powder won’t give you the lift you need.
My muffins came out dense. What happened?
You probably overmixed the batter. When you combine the wet and dry ingredients, mix just until you barely see flour streaks. Lumpy batter = fluffy muffins.
Can I add other mix-ins?
Sure. Chocolate chips, chopped nuts, or lemon zest all work. Just don’t add more than ½ cup total or the muffins won’t hold together properly.
Do I really need to use paper liners?
You can skip them and just grease the muffin tin really well, but the muffins might stick a little. Liners make cleanup easier and help the muffins keep their shape.
Wrapping Up
These blueberry muffins are the kind of recipe you’ll come back to over and over.
They’re simple, reliable, and taste like they came from an expensive bakery (but cost about $0.40 per muffin to make).
Make a batch this weekend. Your kitchen will smell amazing, and you’ll have breakfast sorted for the next few days.
Plus, they’re the kind of thing that makes people think you’re a way better baker than you actually are. 😉
Try them out and let me know how they turn out in the comments below. Did you add any fun mix-ins? Did you manage to wait before eating one fresh out of the oven?
I’d love to hear about it.