You know that moment when you open your fruit bowl and there are three bananas that are basically past the point of eating whole? Yeah, that’s the moment banana bread saves the day.
This isn’t some dense, dry thing that tastes like cardboard. This is actually good banana bread. The kind that makes your house smell incredible while it’s baking. The kind where people ask if you bought it from a bakery.
It’s soft, moist, and has this deep banana flavor that doesn’t feel one-dimensional. There’s a little hint of cinnamon and nutmeg, just enough to make you wonder what’s in there, but not so much that it feels overwhelming.
Best part? It takes about 15 minutes of actual hands-on work. The oven does the heavy lifting for you.
What You’ll Need
For the Banana Bread
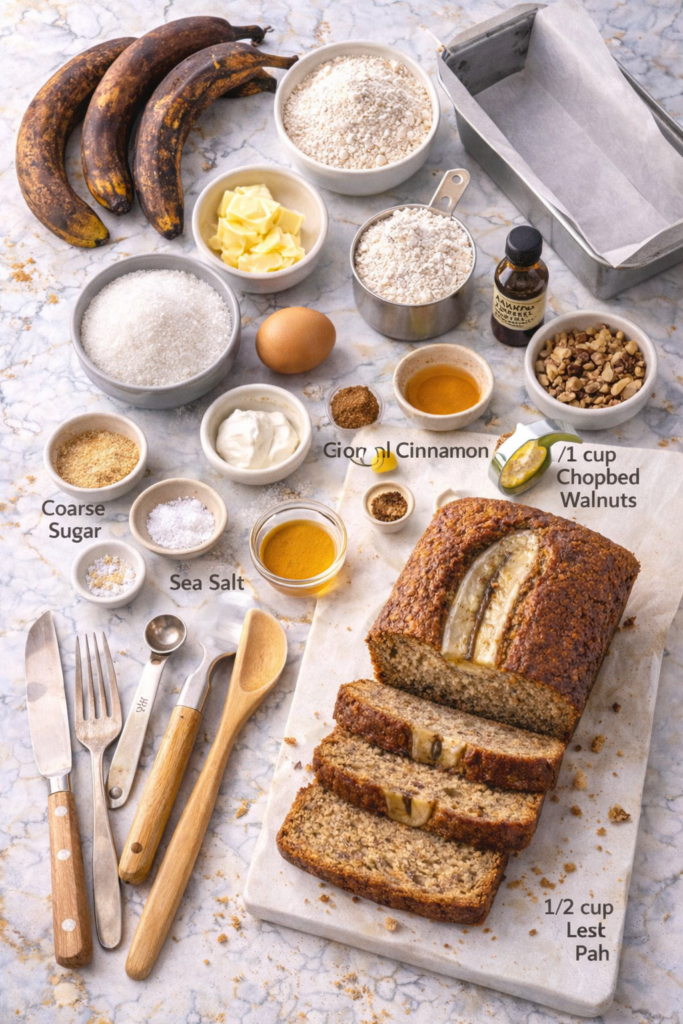
- 3 to 4 overripe bananas (the browner the better, trust me)
- 1/2 cup (115g) unsalted butter, softened to room temperature
- 3/4 cup (150g) granulated sugar
- 1 large egg
- 1/3 cup sour cream (full fat, not the light stuff)
- 1 teaspoon vanilla extract
- 1 3/4 cups (210g) all-purpose flour
- 1 teaspoon baking soda
- 1/4 teaspoon salt
- 1/2 teaspoon ground cinnamon
- 1/4 teaspoon ground nutmeg
- 1/2 cup (55g) chopped walnuts or pecans (optional, but recommended)
For Topping (Optional but Good)
- 1 tablespoon coarse sugar
- Pinch of sea salt
Tools You’ll Need
- 9×5 inch loaf pan
- Mixing bowls (you’ll want at least two)
- Measuring cups and spoons
- Wooden spoon or spatula
- Whisk
- Fork (for mashing bananas)
- Parchment paper or butter for greasing
Pro Tips
1. Use the brownest bananas you can find. Seriously, if they have brown spots or are almost black, that’s perfect. The more ripe the banana, the sweeter and more flavorful your bread will be. If your bananas are still yellow, wait a day or two. This makes a real difference in taste.
2. Don’t overmix the batter. Once you add your dry ingredients to the wet, stir just until combined. Overmixing develops gluten, which makes the bread tough and dense instead of soft and tender. A few small lumps of flour are totally fine. They’ll disappear in the oven.
3. Room temperature butter is your friend. Cold butter is hard to cream with sugar, and you’ll end up with lumps in your batter. Pull your butter out of the fridge 30 minutes before you start baking. If you forget, you can cut it into small pieces and it’ll soften faster.
4. Sour cream is the secret weapon. Most banana bread recipes use buttermilk, but sour cream adds a subtle tang and keeps the bread incredibly moist. It also helps create that tender crumb structure you’re after. Don’t skip it or substitute it with yogurt.
5. Let it cool before slicing. I know the smell is torture, but cutting into warm banana bread is a recipe for it falling apart. Wait at least 15 minutes in the pan, then turn it out onto a wire rack. The bread finishes cooking slightly as it cools, and this helps it set properly.
Substitutions and Variations
| Original | Swap For | Notes |
|---|---|---|
| Walnuts or pecans | Chocolate chips | Adds richness; use 1/2 cup |
| Sour cream | Greek yogurt | Works fine; bread will be slightly less moist |
| All-purpose flour | Whole wheat flour | Use 1 cup whole wheat + 3/4 cup all-purpose for better texture |
| Granulated sugar | Brown sugar | Creates a slightly darker, moister loaf |
| Cinnamon + nutmeg | Cardamom | Use 1/4 teaspoon for a more exotic flavor |
Want to make it gluten-free? Swap the all-purpose flour for a 1-to-1 gluten-free baking blend. The texture will be slightly different but still really good.
Looking for something with extra moisture? Drizzle a simple glaze (powdered sugar + 2 tablespoons milk) over the top while it’s still slightly warm. It soaks right in.
Make Ahead Tips
The batter: You can mix the batter up to 2 hours ahead and keep it covered in the fridge. Bake as you normally would, adding a few extra minutes if needed since it’ll be slightly cold going into the oven.
The bread itself: Banana bread actually tastes better the next day. The flavors meld together and it becomes more moist overnight. Store it wrapped in foil or in an airtight container at room temperature for up to 4 days.
Freezing: Once it’s completely cool, slice it, wrap individual slices in plastic wrap, and throw them in the freezer for up to 3 months. Pop a slice in the toaster oven to thaw and warm it up. It’s perfect for quick breakfasts.
How to Make Banana Bread
Step 1: Prep Your Pan and Ingredients
- Preheat your oven to 350°F (175°C).
- Grease a 9×5 inch loaf pan with butter or line it with parchment paper. This prevents sticking and makes cleanup so much easier.
- Peel your bananas and place them in a medium bowl. Mash them with a fork until mostly smooth. A few small chunks are fine. You should have about 1 cup of mashed banana.
Step 2: Cream the Butter and Sugar
- In a large mixing bowl, combine softened butter and sugar.
- Beat together for about 2 to 3 minutes until the mixture is light, fluffy, and pale in color. This process, called creaming, incorporates air into the batter and helps the bread rise evenly. Don’t rush this step.
- Add the egg and beat until it’s fully incorporated, about 1 minute.
- Stir in the vanilla extract.
Step 3: Add the Wet Ingredients
- Pour in the mashed bananas and sour cream.
- Stir everything together until just combined. There will be some streaks of banana throughout the butter mixture, and that’s okay.
Step 4: Combine Dry Ingredients
- In a separate bowl, whisk together flour, baking soda, salt, cinnamon, and nutmeg. Whisking these together makes sure everything is evenly distributed, which prevents pockets of baking soda taste.
Step 5: Bring It Together
- Add the dry ingredient mixture to the wet ingredients.
- Fold or stir everything together until just combined. The batter should look rough and lumpy. Stop as soon as you don’t see any white flour streaks. Overmixing is the enemy here.
- Fold in the walnuts or pecans if you’re using them.
Step 6: Bake
- Pour the batter into your prepared loaf pan and smooth the top slightly.
- If you want the coarse sugar and sea salt topping, sprinkle it over the top now.
- Bake for 55 to 65 minutes, depending on your oven. The bread is done when a toothpick inserted into the center comes out with just a few moist crumbs (not wet batter, but not completely dry either).
- If the top is browning too quickly, tent it loosely with foil for the last 15 minutes of baking.
Step 7: Cool
- Let the bread cool in the pan for 15 minutes, then turn it out onto a wire rack to cool completely.
- Slice, toast if you want, and enjoy.

Nutritional Breakdown (Per Slice)
Based on 12 slices:
| Nutrient | Amount Per Slice |
|---|---|
| Calories | ~240 |
| Protein | ~3g |
| Carbohydrates | ~32g |
| Fat | ~11g |
| Fiber | ~1g |
| Sodium | ~180mg |
The bananas provide natural sweetness along with potassium and B vitamins. The sour cream adds fat that keeps the bread moist and helps your body absorb fat-soluble vitamins. It’s not a health food, but it’s also not as indulgent as you might think.
What to Serve With It
- Butter and jam (strawberry or raspberry work great)
- Cream cheese spread on a warm slice
- A cup of coffee in the morning
- As French toast if you have slices left over
- With scrambled eggs for a sweet and savory breakfast
Leftovers and Storage
- Room temperature: Store banana bread wrapped in foil or in an airtight container for up to 4 days. It stays soft and moist this way.
- Fridge: Not necessary, but you can refrigerate it for up to a week if you want to extend its life. Just know it may dry out slightly faster than if stored at room temperature.
- Freezer: Wrap the whole loaf in plastic wrap then foil, or slice it first and wrap individual slices. Freezes for up to 3 months. Thaw at room temperature or toast from frozen.
- Reheating: If your banana bread has dried out a bit, wrap a slice in a damp paper towel and microwave for 10 to 15 seconds. It’ll perk right back up.
FAQ
Can I use fresh bananas instead of overripe ones?
You can, but they won’t taste as good. Fresh bananas have less sugar and less developed flavor. They’ll make your bread more bland. Save the fresh bananas for smoothies and wait for these ones to brown up.
Why did my banana bread sink in the middle?
A few reasons: your oven might run hot (causing the edges to set before the center can rise), you might have opened the oven door too early (losing heat), or the batter might have been overmixed. Use an oven thermometer to check your temperature, don’t peek at the bread for at least the first 45 minutes, and remember the “fold gently” rule.
Can I use a different type of flour?
All-purpose flour works best for the tender crumb you want. Whole wheat flour makes it denser and heavier. If you want to use whole wheat, do a blend: 1 cup whole wheat and 3/4 cup all-purpose. Gluten-free flour blends work but the texture will be slightly different.
My banana bread is too sweet. What do I do next time?
You might be using bananas that are too ripe (which is hard to believe, I know). Try using bananas that are ripe but not quite black. Also, make sure you’re measuring the sugar correctly. Too many tablespoons by accident adds up fast. A kitchen scale helps with precision here.
Can I make this in a different pan?
Yes. You can use a 9×9 square pan (reduce baking time to 45 to 50 minutes) or make muffins (bake for 20 to 25 minutes). Just note that the moisture content and baking time will change slightly depending on the shape and size of your pan.
Do I have to add nuts?
Nope. They’re totally optional. The bread is great on its own. Some people don’t like nuts in their baked goods, and that’s completely valid. Skip them if you want.
Why does mine look different from the pictures?
Banana bread color varies wildly depending on your oven, your ingredients, and how ripe your bananas are. Some loaves come out more brown, some more golden. As long as a toothpick comes out with just crumbs, you’re good. It’s not a beauty contest.
Wrapping Up
Banana bread is one of those recipes that feels small but isn’t. It’s the thing you make on a random Tuesday when those bananas are staring at you from the fruit bowl. It’s what you bring to a potluck when you want to impress without actually trying that hard. It’s what you slice and toast and butter on a lazy Saturday morning.
The best part is that once you nail this recipe, you’ll make it over and over. You’ll find yourself wanting to bake it just to fill your house with that smell.
The secret isn’t complicated. It’s just good ingredients, not overmixing, and being patient enough to let it cool before you slice into it.
Give this a try and let me know how it goes. Did you add nuts or leave them out? Did you toast your slices? Any tweaks you made? Drop a comment below.