You know that moment when you’re standing in front of your fridge at lunch, staring at the same old boring options, and your stomach just groans?
I’ve been there.
Like, a hundred times.
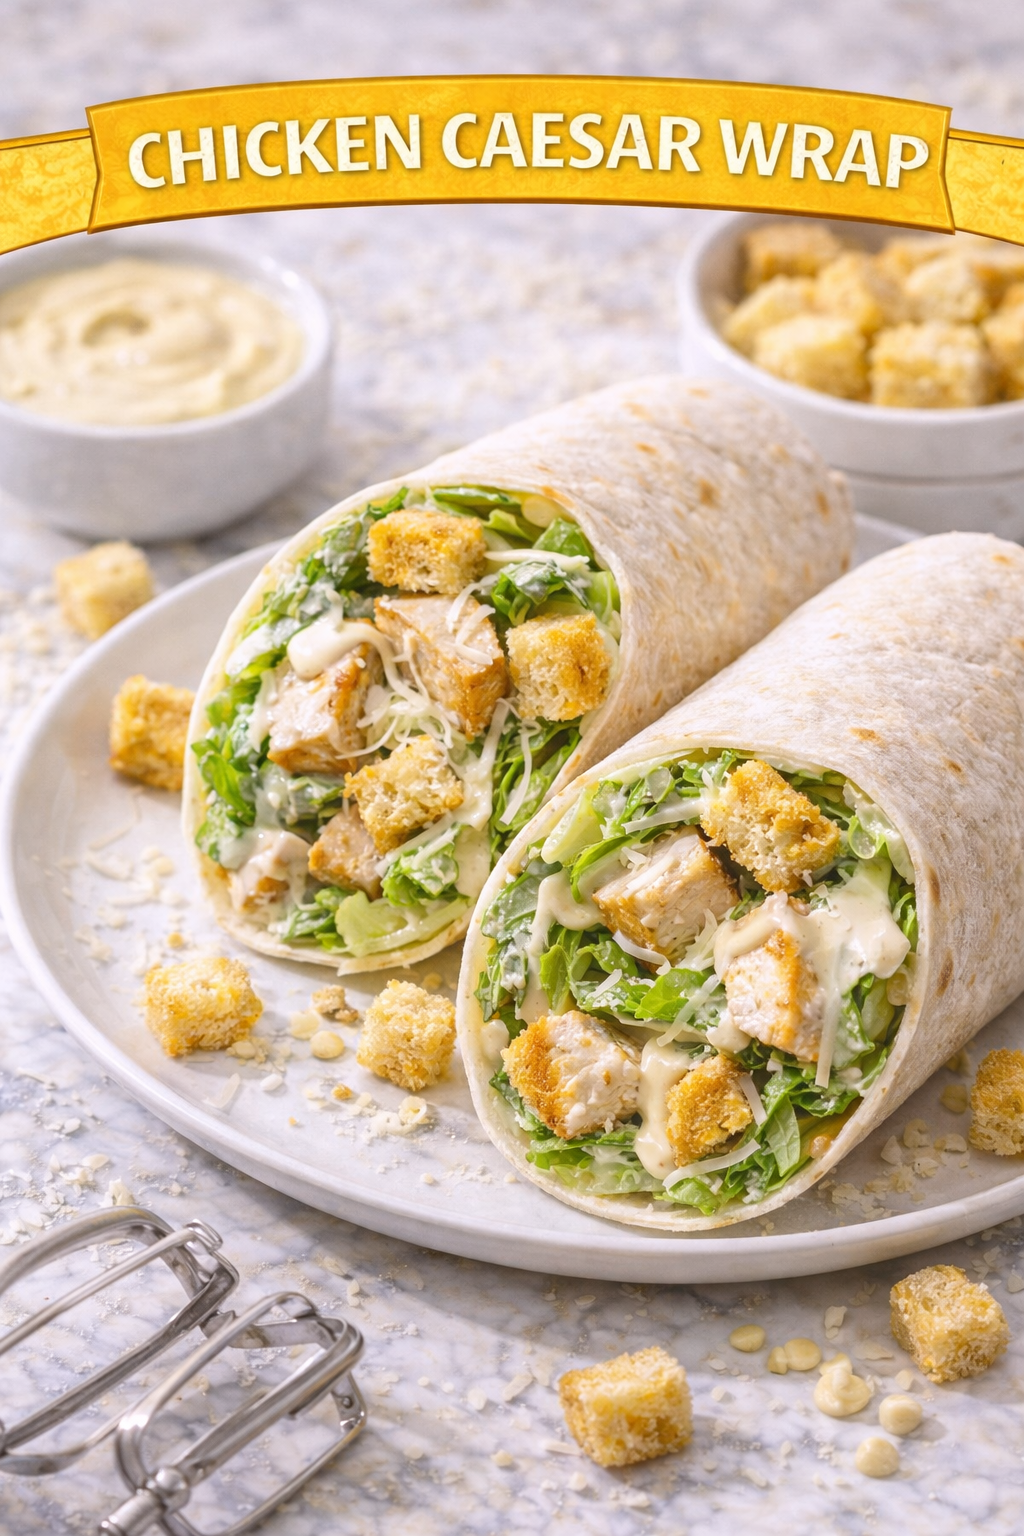
And that’s exactly how this chicken caesar wrap became my go-to lunch savior. It takes everything you love about a classic Caesar salad and wraps it up into something you can actually eat with your hands while answering emails or running errands.
No fork required. No soggy lettuce disasters. Just pure, crispy, creamy perfection.
I started making these when I got tired of spending $12 on mediocre wraps from cafes that were mostly just tortilla and disappointment. Turns out, making them at home is ridiculously easy, tastes way better, and costs about a third of the price.
So if you’re ready to turn your lunch game around, grab your cutting board and let’s do this.
What You’ll Need
For the Chicken:
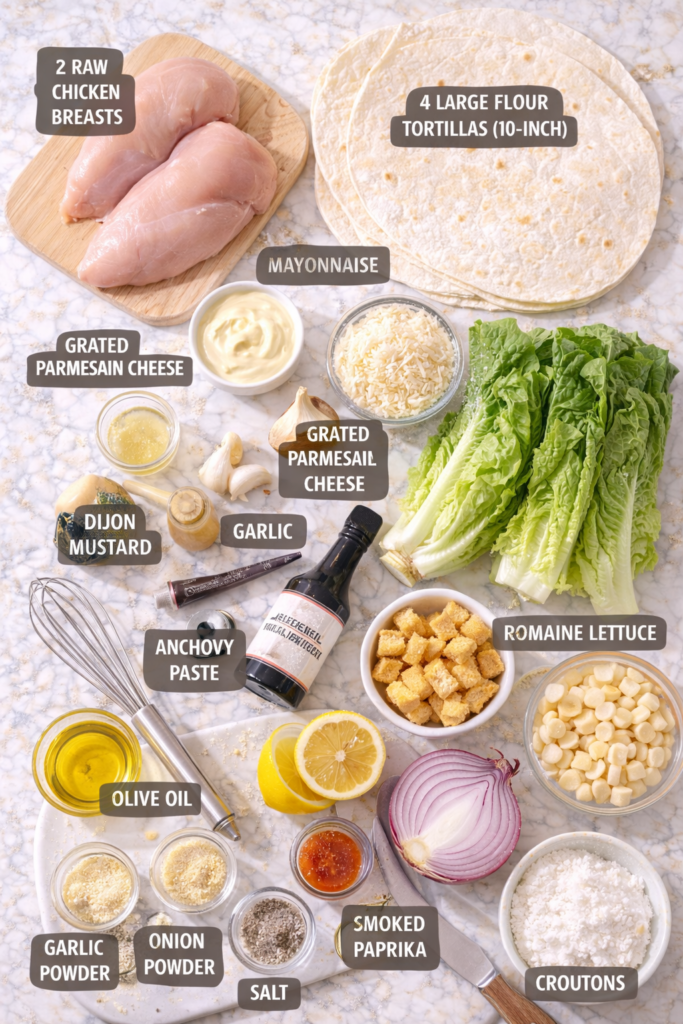
- 1 lb boneless, skinless chicken breast (about 2 large breasts)
- 2 tablespoons olive oil
- 1 teaspoon garlic powder
- 1 teaspoon onion powder
- 1/2 teaspoon smoked paprika
- 1/2 teaspoon salt
- 1/4 teaspoon black pepper
For the Caesar Dressing:
- 1/2 cup mayonnaise
- 1/4 cup grated Parmesan cheese
- 2 tablespoons fresh lemon juice
- 1 tablespoon Dijon mustard
- 2 cloves garlic, minced
- 1 teaspoon Worcestershire sauce
- 1/2 teaspoon anchovy paste (trust me on this)
- Salt and pepper to taste
For the Wraps:
- 4 large flour tortillas (10-inch)
- 4 cups romaine lettuce, chopped
- 1 cup shaved Parmesan cheese
- 1 cup cherry tomatoes, halved
- 1/2 cup croutons, crushed
- 1/4 red onion, thinly sliced (optional)
Tools You’ll Need
The beauty of this recipe? You probably have everything already.
- Large skillet or grill pan
- Cutting board
- Sharp knife
- Mixing bowls (2-3)
- Whisk or fork
- Tongs
- Meat thermometer (optional but helpful)
- Microfiber cloth or paper towels
Nothing fancy. Just the basics.
Pro Tips
Pound your chicken flat. I’m talking like 1/2 inch thickness across the whole breast. This is the secret to getting perfectly cooked chicken that doesn’t end up dry on the edges and raw in the middle. Use a meat mallet or even the bottom of a heavy pan.
Don’t skip the anchovy paste. I know, I know. You’re thinking “anchovies? In my wrap?” But here’s the thing: you won’t taste fish. You’ll just taste incredible depth and that signature Caesar tang. It’s literally what makes Caesar dressing Caesar dressing. The tube kind lasts forever in your fridge and you only need a tiny bit.
Make your dressing ahead. The flavors get so much better when they sit for even just 30 minutes. Make it the night before if you’re meal prepping, or whip it up while your chicken is cooking. It’ll keep in the fridge for up to a week.
Let the chicken rest. After cooking, let it sit for 5 minutes before slicing. This keeps all those juices locked in instead of running all over your cutting board. Your chicken stays tender and moist.
Toast your tortillas lightly. Just 20 seconds per side in a dry pan. This creates a tiny barrier that keeps your wrap from getting soggy and falling apart an hour later. Game changer for meal prep.
How to Make the Perfect Chicken Caesar Wrap
Step 1: Prep Your Chicken
Start by patting your chicken breasts completely dry with paper towels. This is important because wet chicken won’t get that nice golden sear.
Place each breast between two pieces of plastic wrap or parchment paper and pound them to an even 1/2-inch thickness. You want them flat and uniform so they cook evenly.
Mix your olive oil with garlic powder, onion powder, smoked paprika, salt, and pepper in a small bowl. Rub this all over both sides of the chicken.
Step 2: Cook the Chicken
Heat a large skillet over medium-high heat. Once it’s hot (a drop of water should sizzle and evaporate immediately), add your seasoned chicken breasts.
Cook for 6-7 minutes on the first side without moving them. You want a nice golden-brown crust.
Flip and cook for another 5-6 minutes until the internal temperature hits 165°F.
Remove from heat and let rest for 5 minutes on a cutting board.
Slice into thin strips. The thinner, the better for wrapping.
Step 3: Make the Caesar Dressing
While your chicken is resting, make your dressing. This takes literally 2 minutes.
In a medium bowl, whisk together the mayo, Parmesan, lemon juice, Dijon, minced garlic, Worcestershire sauce, and anchovy paste.
Taste it. Add salt and pepper as needed. Some people like it more lemony, some like it more garlicky. Adjust to your preference.
If it’s too thick, add a tablespoon of water or milk to thin it out. You want it pourable but not runny.
Step 4: Prep Your Veggies
Chop your romaine into bite-sized pieces. Not too small or it’ll fall out everywhere. Not too big or you won’t be able to wrap it properly.
Halve your cherry tomatoes. Thinly slice your red onion if you’re using it.
Crush your croutons into smaller pieces. You want texture, but you also want to be able to actually bite through your wrap without everything shooting out the other end.
Step 5: Warm Your Tortillas
This step is clutch. Heat a dry skillet over medium heat and warm each tortilla for about 20 seconds per side.
They should be pliable and slightly toasted but not crispy. This makes them easier to roll and helps prevent sogginess.
Step 6: Assemble Your Wraps
Lay out your warm tortilla on a clean surface.
Add about 1 cup of chopped romaine down the center, leaving about 2 inches on each side.
Top with sliced chicken (about 4-5 oz per wrap).
Drizzle generously with Caesar dressing. Don’t be shy here.
Add cherry tomatoes, shaved Parmesan, crushed croutons, and red onion if using.
Step 7: The Wrap Technique
Here’s how to get a tight, non-falling-apart wrap:
Fold in the sides first (those 2 inches you left empty). Then, starting from the bottom edge closest to you, roll tightly upward, tucking as you go.
The key is keeping tension on the wrap as you roll. Not so tight it tears, but tight enough that nothing shifts around.
If you’re meal prepping, wrap tightly in parchment paper or foil. Cut in half on the diagonal right before eating.

Substitutions and Variations
For the Chicken:
- Use rotisserie chicken to save time (just shred about 2 cups)
- Swap for grilled shrimp
- Try blackened salmon for a fancy twist
- Go vegetarian with crispy chickpeas
For the Dressing:
- Make it lighter with Greek yogurt instead of half the mayo
- Go dairy-free with vegan mayo and nutritional yeast instead of Parmesan
- Add avocado for creaminess
For the Tortilla:
- Use whole wheat for more fiber
- Try spinach or tomato wraps for color
- Go low-carb with large lettuce leaves (romaine or butter lettuce work great)
- Use lavash bread for a different texture
Add-ins I Love:
- Crispy bacon (because bacon makes everything better)
- Sliced avocado
- Pickled red onions for tang
- Jalapeños for heat
- Roasted red peppers
- Grilled corn
Make Ahead Tips
These wraps are perfect for meal prep, but you need to be strategic about it.
Cook chicken up to 3 days ahead. Store sliced chicken in an airtight container in the fridge. Reheat gently or eat cold.
Make dressing up to 1 week ahead. Store in a jar or squeeze bottle in the fridge. Give it a good shake before using.
Prep your veggies the night before. Keep lettuce, tomatoes, and other toppings in separate containers. Don’t chop the lettuce too far in advance or it’ll brown.
For grab-and-go wraps: Assemble them the night before but keep the dressing separate. Pack it in a small container and drizzle it on right before eating. This prevents sogginess.
Freezing: The chicken freezes great for up to 3 months. The assembled wraps? Not so much. The lettuce gets sad and wilted.
Nutrition Information (Per Wrap)
- Calories: 520
- Protein: 38g
- Carbohydrates: 42g
- Fat: 22g
- Fiber: 4g
- Sodium: 890mg
This is an estimate and will vary based on your exact ingredients and portion sizes.
Leftovers and Storage
Assembled Wraps: Best eaten within 4-6 hours if you want them crispy. Store in the fridge wrapped tightly in parchment paper or foil for up to 24 hours, but expect some moisture.
Components Stored Separately: This is the way to go. Cooked chicken lasts 3-4 days in the fridge. Dressing lasts up to 1 week. Chopped veggies last 2-3 days. Assemble fresh when you’re ready to eat.
Reheating Chicken: If you prefer warm chicken, reheat slices in a skillet over medium heat for 2-3 minutes, or microwave for 30-45 seconds. Don’t overdo it or it’ll dry out.
Freezing Cooked Chicken: Slice it first, then freeze in a single layer on a baking sheet. Once frozen, transfer to a freezer bag. Thaw overnight in the fridge.
FAQ
Can I use store-bought Caesar dressing?
Absolutely. I won’t judge. But honestly, homemade takes 2 minutes and tastes about 10 times better. Plus you control the garlic level, which is important.
Do I have to use anchovy paste?
You don’t have to, but your dressing won’t taste like Caesar. It’ll just taste like creamy garlic dressing. Which is still good, just different. If you’re really opposed, add an extra splash of Worcestershire sauce for that umami depth.
How do I keep my wrap from getting soggy?
Three tricks: toast your tortilla lightly, don’t overdress it, and if meal prepping, keep the dressing separate until you’re ready to eat. Also, pat your lettuce completely dry after washing.
Can I make this ahead for lunch meal prep?
Yes! Just store all components separately and assemble in the morning or even at lunch. Takes 2 minutes to throw together. If you’re really short on time, assemble the night before but wrap it super tight and keep dressing on the side.
What if I don’t have a meat thermometer?
Cut into the thickest part of the chicken. The juices should run clear, not pink. The meat should be white throughout, not translucent or pink. But honestly? A $10 meat thermometer will change your cooking game forever.
Can I grill the chicken instead?
Definitely. Preheat your grill to medium-high (about 400°F). Grill for 5-6 minutes per side. Let it rest, then slice.
Is this gluten-free?
Not as written because of the tortilla and croutons. But swap for gluten-free tortillas and skip the croutons (or use gluten-free ones). Make sure your Worcestershire sauce is gluten-free too.
How many wraps does this make?
This recipe makes 4 large, generously filled wraps. Perfect for 4 people or 2 people with leftovers for lunch the next day.
Wrapping Up
Listen, I get it. Making lunch at home can feel like just another chore on your endless to-do list.
But this chicken caesar wrap? It’s the kind of lunch that actually makes you look forward to your lunch break. It’s satisfying, packed with protein, and way better than whatever sad desk lunch you were planning.
Plus, once you make it a couple times, you can literally throw these together in 20 minutes. I’m talking from-start-to-eating in the time it would take you to order delivery and wait for it to arrive.
The crispy chicken, the tangy dressing, the crunch from the croutons and fresh romaine… it all just works.
So make it this week. Seriously. Your future lunchtime self will thank you.
And when you do? Come back and drop a comment. Tell me if you added bacon (you should). Tell me if you went rogue with the dressing. Tell me if your coworkers got jealous.
I want to hear all about it. 🌯