I’ll be honest with you: I didn’t think making English muffins from scratch was worth it until I actually tried it.
Store-bought ones are fine, sure. But once you’ve had a fresh, warm English muffin straight from your own griddle, with all those perfect little pockets just begging for butter to melt into them, you can’t really go back.
The texture is completely different. The flavor is richer. And the satisfaction of making something this good from just a handful of basic ingredients? That’s just a bonus.
I started making these on Sunday mornings, and now my family requests them at least twice a week. They’re not complicated, they don’t require any fancy equipment, and you probably already have everything you need sitting in your pantry right now.
Let me show you how to make them.
What You’ll Need
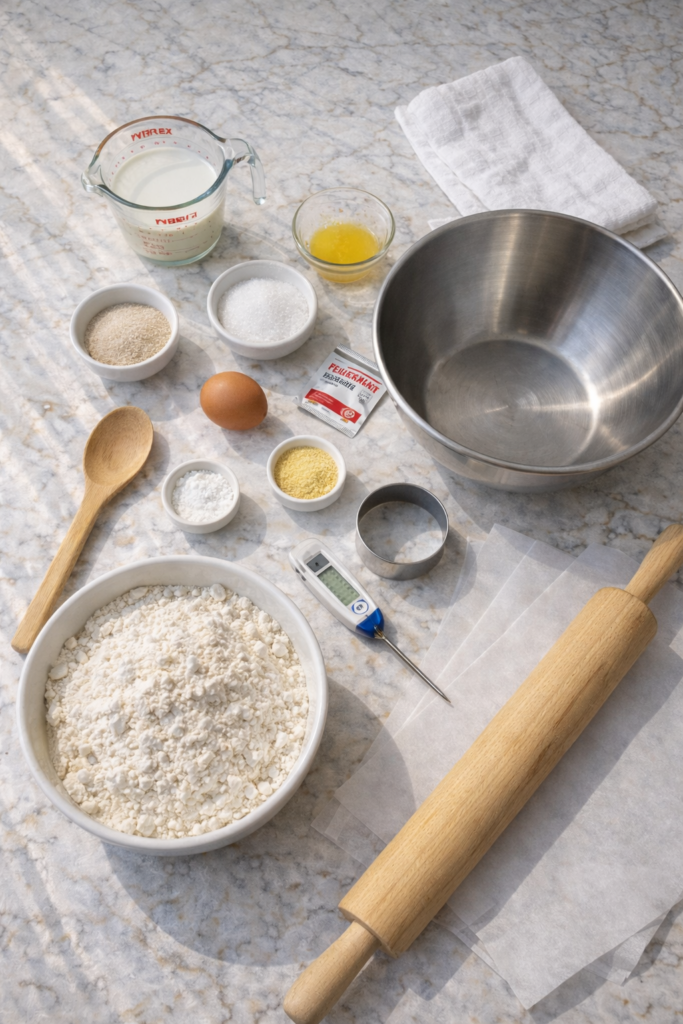
For the Dough:
- 1 cup whole milk (warmed to about 110°F)
- 2 tablespoons unsalted butter (melted)
- 1 tablespoon granulated sugar
- 2¼ teaspoons active dry yeast (1 standard packet)
- 1 large egg (room temperature)
- 3 cups all-purpose flour
- 1 teaspoon salt
- ¼ cup cornmeal (for dusting)
Tools You’ll Need:
- Large mixing bowl
- Wooden spoon or stand mixer with dough hook
- Kitchen thermometer (optional but helpful)
- Rolling pin
- 3-inch round cutter (a drinking glass works too)
- Large griddle or cast-iron skillet
- Baking sheet
- Parchment paper
- Clean kitchen towel
Pro Tips
Yeast activation is everything. Your milk needs to be warm enough to wake up the yeast, but not so hot that it kills it. Think bathwater temperature. If you’re not sure, err on the cooler side. Dead yeast means flat muffins.
Don’t skip the cornmeal dusting. This isn’t just for looks. The cornmeal creates those little crispy bits on the outside and helps prevent sticking. Plus, it’s what gives English muffins their signature texture.
Low and slow on the griddle. The biggest mistake people make is cooking these too hot. You want a medium-low heat so the insides cook through before the outsides burn. Patience pays off here.
Fork-split, never knife-cut. Once they’re cool, use a fork to split them open instead of slicing with a knife. This creates those nooks and crannies that make English muffins special. A knife gives you a smooth surface, which defeats the whole purpose.
Make extra and freeze them. These freeze beautifully for up to 3 months. Just let them cool completely, split them with a fork, and store them in a freezer bag. Pop them straight into the toaster from frozen.
Substitutions and Variations
Dairy-Free: Swap the milk for oat milk or almond milk (warmed the same way) and use vegan butter. The texture stays pretty much the same.
Whole Wheat: Replace up to half the all-purpose flour with whole wheat flour. They’ll be denser but have a nuttier flavor.
Sourdough English Muffins: Replace ½ cup of the flour and ½ cup of the milk with active sourdough starter. Reduce the yeast to 1 teaspoon. The fermentation adds a subtle tang that’s really good.
Cinnamon Raisin: Add 1 tablespoon of cinnamon to the flour and fold in ½ cup of raisins after the first rise. These are perfect for breakfast.
Everything Bagel: Skip the cornmeal and dust with everything bagel seasoning before cooking. Game changer.
How to Make English Muffins
Step 1: Activate the yeast
Warm your milk to about 110°F. Pour it into a large bowl, add the sugar and yeast, and give it a quick stir.
Let it sit for 5-10 minutes until it gets foamy on top. That foam means your yeast is alive and ready to work.
Step 2: Mix the dough
Add the melted butter and egg to your yeast mixture. Whisk it together.
In a separate bowl, combine the flour and salt. Add this to your wet ingredients about a cup at a time, stirring with a wooden spoon until it comes together into a shaggy dough.
Step 3: Knead until smooth
Turn the dough out onto a lightly floured surface and knead for about 8-10 minutes. You can also use a stand mixer with a dough hook for 5-6 minutes on medium speed.
The dough should be smooth and slightly tacky, but not sticky. If it’s sticking to your hands, add a tiny bit more flour, just a tablespoon at a time.
Step 4: First rise
Shape the dough into a ball and place it in a lightly greased bowl. Cover it with a clean kitchen towel and let it rise in a warm spot for about 1 hour, or until it doubles in size.
I usually turn my oven on to the lowest setting for 1 minute, then turn it off and let the dough rise in there. Works like a charm.
Step 5: Roll and cut
Punch down your risen dough and turn it out onto a surface that’s been dusted with cornmeal (not flour this time).
Roll it out to about ½ inch thick. Use your 3-inch cutter to cut out rounds. You should get about 10-12 muffins depending on how thick you roll them.
Step 6: Second rise
Place your cut rounds on a baking sheet that’s been lined with parchment paper and sprinkled with cornmeal. Dust the tops with more cornmeal too.
Cover them loosely with a towel and let them rise for another 30 minutes. They should puff up nicely.
Step 7: Cook on the griddle
Heat a large griddle or cast-iron skillet over medium-low heat. You don’t need any oil or butter.
Carefully transfer the muffins to the griddle (they’ll be a bit delicate). Cook for 7-8 minutes on the first side, until they’re golden brown.
Flip them and cook for another 7-8 minutes on the second side. They should sound hollow when you tap the top.
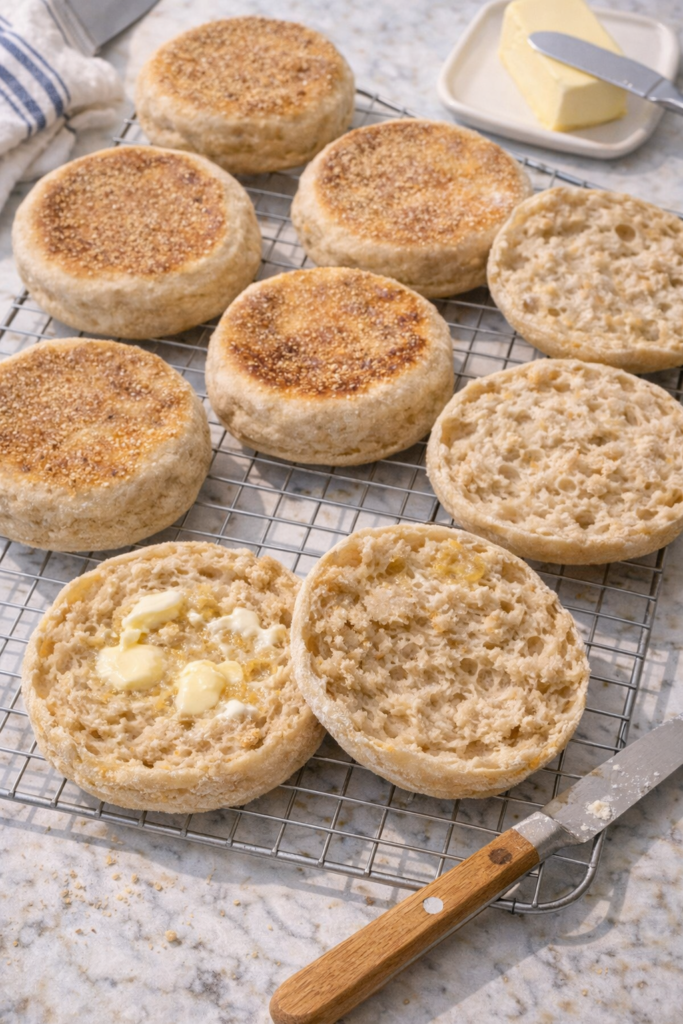
Step 8: Cool and split
Let them cool completely on a wire rack. This is important because they’re still cooking inside from residual heat.
Once cool, use a fork to gently poke around the edges and split them open. You’ll see all those beautiful nooks and crannies.
Make-Ahead Tips
The dough can be refrigerated after the first rise. Just punch it down, cover it tightly, and refrigerate for up to 24 hours. When you’re ready to use it, let it come to room temperature for about 30 minutes before rolling and cutting.
Prep them the night before. After cutting the rounds, you can cover them and refrigerate them overnight. In the morning, let them sit at room temperature for 30 minutes, then cook as directed.
Leftovers and Storage
Keep these in an airtight container at room temperature for up to 3 days. They stay surprisingly fresh.
For longer storage, freeze them. Split them first with a fork, then stack them in a freezer bag with parchment paper between each one. They’ll keep for 3 months.
Toast them straight from the freezer. No need to thaw.
Nutritional Information
Per English muffin (based on 12 muffins):
- Calories: 165
- Protein: 5g
- Carbohydrates: 28g
- Fat: 3g
- Fiber: 1g
- Sugar: 2g
- Sodium: 200mg
These are estimates and can vary based on exact ingredients used.
Meal Pairing Suggestions
These English muffins work with just about anything, but here are some of my favorite ways to enjoy them:
Classic breakfast sandwich: Fry an egg, add a slice of cheese and some bacon or sausage. The nooks and crannies catch all the runny yolk.
Eggs Benedict: Use these instead of store-bought muffins. The texture holds up better under hollandaise sauce.
Pizza muffins: Split them, add marinara sauce, mozzarella, and pepperoni. Pop under the broiler for a quick lunch.
Avocado toast: Mash up some avocado with lemon juice, salt, and red pepper flakes. The texture contrast is perfect.
Burgers: Yes, seriously. Use these as burger buns. They hold up to juicy patties way better than you’d think.
FAQ
Can I make these without a stand mixer?
Absolutely. I actually prefer making them by hand. The kneading only takes about 10 minutes and it’s kind of therapeutic.
Why are my English muffins dense?
Usually this means the yeast wasn’t active enough (check the expiration date) or you didn’t let them rise long enough. They need to double in size during both rises.
Can I bake these in the oven instead of cooking them on a griddle?
You can, but you won’t get the same texture. The griddle cooking is what creates that crispy exterior and soft interior. If you must bake them, use 375°F for about 15 minutes, but know they’ll be more like rolls than traditional English muffins.
What if I don’t have a round cutter?
Use a drinking glass or a jar lid. Anything with a 3-inch diameter works. I’ve even used a clean tuna can with both ends removed.
Can I make mini English muffins?
Sure. Cut them smaller (about 2 inches) and reduce the cooking time to 5-6 minutes per side.
Why do they need to be fork-split?
The irregular surface created by fork-splitting creates more places for butter, jam, or whatever else you’re putting on them to settle into. A smooth knife cut just doesn’t have the same effect.
How do I know when they’re done cooking?
They should be golden brown on both sides and spring back when you press the top lightly. If you’re not sure, you can use an instant-read thermometer. The internal temperature should be around 190°F.
Can I add herbs or cheese to the dough?
You can. Fold in shredded cheese, dried herbs, or minced garlic after the first rise. Just keep additions to about ½ cup total so you don’t weigh down the dough too much.
Wrapping Up
Making English muffins from scratch isn’t something I thought I’d ever do regularly, but here we are.
They’re just one of those things that’s so much better homemade. The texture, the flavor, the way butter melts into every little pocket when they’re still warm… it’s worth the small effort.
Try making a batch this weekend. Toast one up with butter and jam while it’s still warm, and you’ll see what I mean.
Drop a comment below if you make these! I’d love to hear what toppings or variations you try.