I never thought I’d be that person who makes their own sandwich bread.
But here we are. And I’m not going back to store-bought anytime soon.
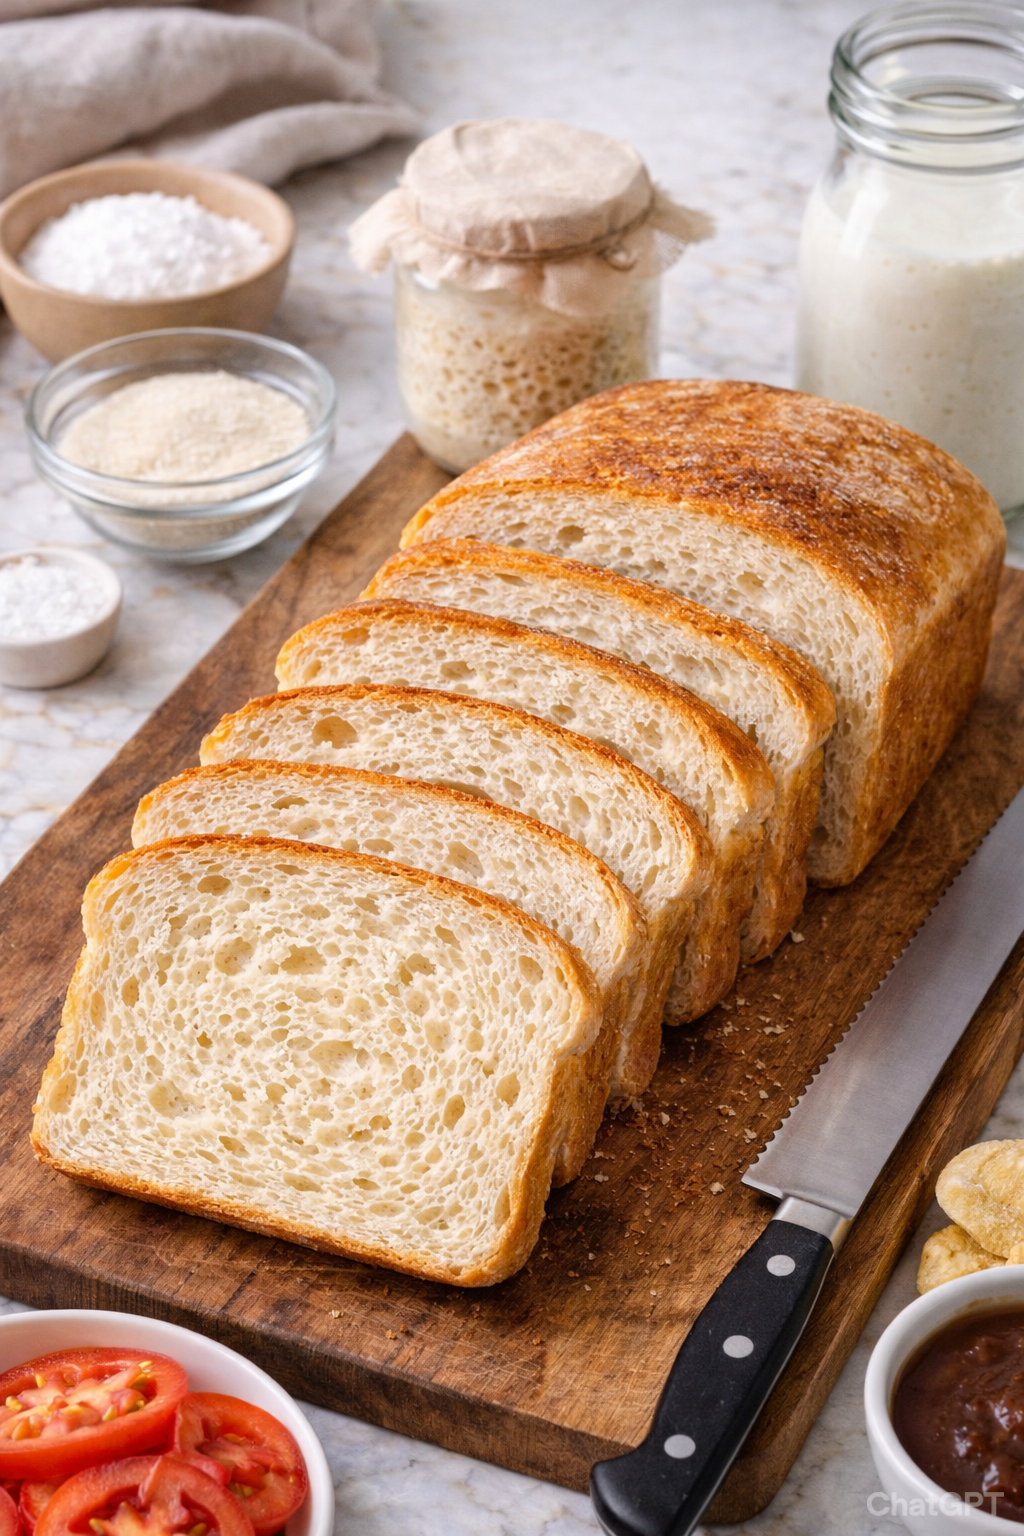
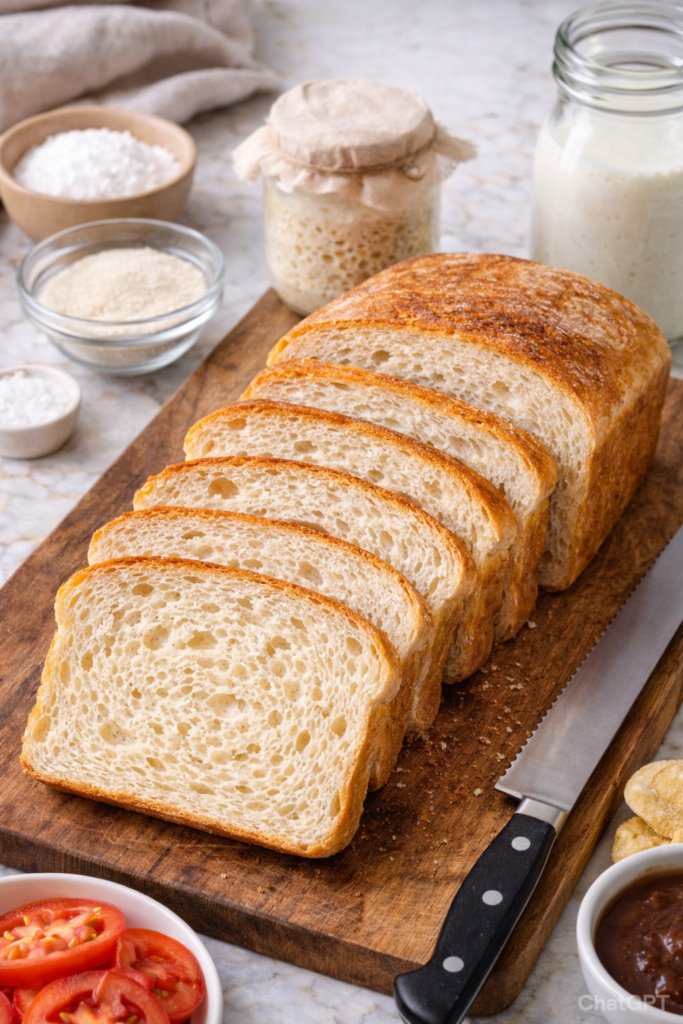
There’s this weird thing that happens when you pull a loaf of homemade sourdough sandwich bread from the oven. The smell fills your entire kitchen, the crust is golden and crispy, and you know that tomorrow’s lunch is going to be about 100 times better than usual.
This isn’t your traditional crusty artisan loaf that’s impossible to bite through. This is soft, fluffy, perfectly sliceable sandwich bread that just happens to be sourdough.
I started making this recipe about six months ago when I got tired of spending $8 on a single loaf of “artisan” bread at the grocery store. I figured if I was going to spend money on good bread, I might as well learn to make it myself.
And turns out, it’s way easier than I expected.
What You’ll Need
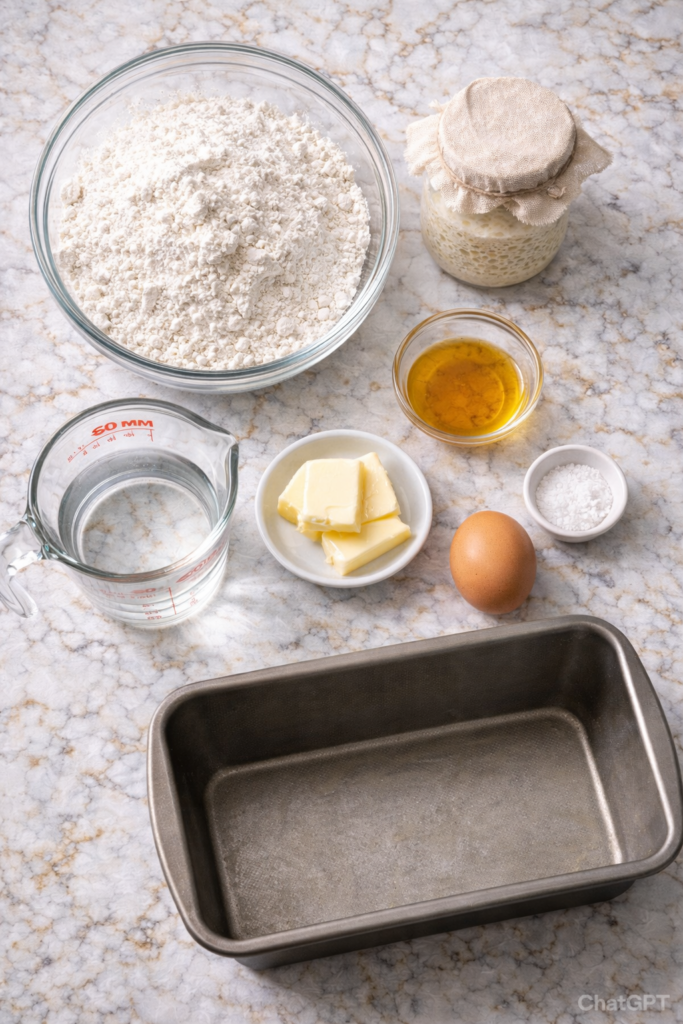
For the Dough:
- 500g bread flour
- 150g active sourdough starter (fed and bubbly)
- 300ml warm water
- 40g honey or sugar
- 50g softened butter
- 10g salt
- 1 egg (for egg wash)
For the Pan:
- Butter or oil for greasing
That’s it. Seven main ingredients and you’re on your way to bread that’ll make your sandwiches actually exciting.
Tools You’ll Need
You probably have most of these already:
- Large mixing bowl
- 9×5 inch loaf pan
- Kitchen scale (highly recommended for accuracy)
- Stand mixer with dough hook (optional but helpful)
- Clean kitchen towel
- Pastry brush
- Sharp knife or bread lame
- Wire cooling rack
The kitchen scale is really the only thing I’d say is essential here. Baking is chemistry, and measuring by weight gives you way more consistent results.
Pro Tips
Feed your starter the night before. You want it bubbly and active when you start making the dough. Mine usually doubles in size about 6-8 hours after feeding.
Water temperature matters. Warm water (around 90-100°F) helps activate the yeast and gets fermentation going. Too hot and you’ll kill the good bacteria. Too cold and everything takes forever.
Don’t skip the stretch and folds. I know it sounds fancy, but this step is what gives your bread that perfect texture. You’re building gluten structure without overworking the dough.
The float test is your friend. Not sure if your starter is ready? Drop a small spoonful in water. If it floats, you’re good to go.
Room temperature affects rising time. My kitchen runs cold in winter, so I often put my dough in the oven (turned off) with just the light on. Creates the perfect warm spot.
How to Make Sourdough Sandwich Bread
Step 1: Mix the Dough
In a large bowl, combine your active sourdough starter, warm water, and honey. Whisk them together until everything’s dissolved and slightly frothy.
Add your flour and mix until you get a shaggy dough. It’ll look messy and that’s fine.
Cover the bowl and let it rest for 30 minutes. This is called autolyse and it helps develop gluten naturally.
Step 2: Add Salt and Butter
After the rest, add your salt and softened butter to the dough. Using your hands or a stand mixer with the dough hook, work it in until fully incorporated.
The dough will be sticky at first but will come together as you work it. If using a stand mixer, mix on low speed for about 8-10 minutes.
Step 3: Bulk Fermentation
Transfer the dough to a lightly oiled bowl. Cover it with a damp kitchen towel.
Now comes the waiting game. Let it sit at room temperature for about 4-6 hours. You’re looking for the dough to increase in size by about 50%.
During this time, perform stretch and folds every 30 minutes for the first 2 hours. Here’s how: grab one side of the dough, stretch it up, and fold it over itself. Rotate the bowl 90 degrees and repeat. Do this four times (once on each side).
This builds strength in the dough without traditional kneading.
Step 4: Shape the Loaf
Once bulk fermentation is done, turn the dough out onto a lightly floured surface.
Gently press it into a rectangle roughly the width of your loaf pan. Starting from the short end, roll it up tightly like a cinnamon roll.
Pinch the seam closed and place it seam-side down in your greased loaf pan.
Step 5: Final Rise
Cover the pan with a damp towel and let it rise again. This takes about 2-3 hours at room temperature.
You’ll know it’s ready when the dough has risen about an inch above the rim of the pan. If you gently press a finger into it, the indent should slowly spring back.
Step 6: Bake
Preheat your oven to 375°F.
Beat your egg with a tablespoon of water and brush it over the top of the loaf. This gives you that gorgeous golden crust.
If you want a soft crust, skip the egg wash and just brush with melted butter instead.
Score the top with a sharp knife or bread lame. A single slash down the center works great.
Bake for 40-45 minutes until the top is deeply golden and the internal temperature reaches 190°F.
The loaf should sound hollow when you tap the bottom.
Step 7: Cool
Remove the bread from the pan immediately and place it on a wire rack.
I know this is the hardest part, but let it cool completely before slicing. At least an hour. The bread is still cooking inside and slicing too early will give you a gummy texture.
Trust me, I’ve learned this the hard way multiple times.
Substitutions and Variations
Flour: You can swap up to 100g of the bread flour for whole wheat flour. This gives you a nuttier flavor and more fiber. Just note that whole wheat absorbs more water, so you might need to add an extra tablespoon or two of water.
Sweetener: Maple syrup works great instead of honey. You can also use regular white sugar if that’s what you have.
Dairy-free: Replace the butter with coconut oil or olive oil. For the egg wash, use milk (dairy or non-dairy) instead.
Seeds: Add 2-3 tablespoons of seeds to the dough during mixing. Sunflower, sesame, or poppy seeds all work well.
Herbs: Mix in a tablespoon of dried herbs like rosemary or thyme for a savory twist.
Make Ahead Tips
The beauty of sourdough is how flexible it can be with timing.
After shaping the loaf, you can stick it in the fridge for an overnight cold fermentation instead of the final room temperature rise. This actually develops even more flavor.
Just take it out in the morning, let it come to room temperature for about an hour, and then bake as directed.
You can also freeze the baked loaf. Slice it first, then freeze the slices in a freezer bag with parchment paper between them. Pull out individual slices as needed and toast them straight from frozen.
Nutritional Information
Per slice (assuming 12 slices per loaf):
- Calories: 185
- Protein: 6g
- Carbohydrates: 32g
- Fat: 4g
- Fiber: 1g
- Sugar: 4g
- Sodium: 325mg
The fermentation process in sourdough actually breaks down some of the gluten and phytic acid, making it easier to digest than regular bread. Plus, sourdough has a lower glycemic index, so it won’t spike your blood sugar as dramatically.
Meal Pairing Suggestions
This bread is incredibly versatile.
I’ve used it for everything from classic PB&J to fancy grilled cheese with brie and fig jam. It makes killer French toast on weekend mornings. And it’s perfect for those loaded avocado toast situations with all the toppings.
My favorite pairing lately has been using it for breakfast sandwiches. Fried egg, crispy bacon, a slice of cheddar, maybe some hot sauce. It holds up to all the fillings without getting soggy.
For dinner, it’s great alongside soup or as the base for an open-faced roasted vegetable sandwich.
Cooking Time Efficiency
Here’s the real talk about timing.
Total active time: About 30 minutes spread throughout the day Total passive time: 8-10 hours (but you can stretch this with cold fermentation)
Most of the time is just waiting for the dough to do its thing. I usually start the dough in the morning after feeding my starter the night before. By late afternoon, it’s ready to bake, and I have fresh bread for dinner.
If you’re working a 9-5, you can also start the dough when you get home, do the bulk fermentation overnight in the fridge, shape it in the morning, let it do the final rise during the day, and bake it when you get home.
Sourdough is weirdly accommodating once you get the hang of it.
Storage and Leftovers
Keep the bread in a plastic bag at room temperature for up to 5 days. I find it stays softer longer than store-bought bread thanks to all that fermentation.
After day 3, it might start to dry out a bit, but it’s still perfect for toasting or making grilled cheese.
For longer storage, slice and freeze as I mentioned earlier. Frozen bread stays good for up to 3 months.
Pro tip: don’t refrigerate your bread. It actually goes stale faster in the fridge. Room temperature or frozen are your two best options.
Troubleshooting Guide
Dense bread? Your starter might not have been active enough, or you didn’t let it rise long enough. Make sure your starter doubles in size after feeding before using it.
Gummy texture? You probably sliced into it too soon. Patience is key here.
Didn’t rise much? Could be that your kitchen was too cold, or your starter wasn’t strong enough. Try finding a warmer spot or giving your starter a few more feeding cycles to get it really active.
Too sour? Shorten your bulk fermentation time. The longer it ferments, the more sour it gets.
Crust too hard? Brush with butter right after baking and store in a plastic bag instead of leaving it exposed to air.
FAQ
Can I use all-purpose flour instead of bread flour?
You can, but your bread won’t be quite as fluffy. Bread flour has more protein which develops more gluten, giving you that perfect sandwich bread texture. If you only have all-purpose, it’ll still work, just expect a slightly denser loaf.
Do I have to use a stand mixer?
Not at all. I made this by hand for months before I got a stand mixer. It just takes a bit more elbow grease and time. The stretch and folds help develop the gluten, so you don’t need to do a ton of traditional kneading anyway.
Why is my bread not rising?
Check your starter first. If it’s not bubbly and active, your bread won’t rise properly. Also make sure your water wasn’t too hot (which would kill the yeast) or your kitchen isn’t too cold (which slows everything down).
Can I add mix-ins like cheese or olives?
Absolutely! Add them during the last stretch and fold so they get distributed throughout the dough. Just don’t go overboard, about 1 cup of mix-ins is usually the sweet spot.
How long does homemade sourdough bread last?
At room temperature in a bag, about 5 days. In the freezer, up to 3 months. Just don’t refrigerate it.
Can I make this without the honey?
Yes, but the honey feeds the yeast and adds a slight sweetness that balances the sour flavor. If you skip it entirely, your fermentation might take longer and the flavor will be more tangy.
What if I don’t have time to bake it after the final rise?
Pop it in the fridge! It’ll slow down the fermentation. You can bake it cold from the fridge or let it come to room temp for 30 minutes first.
Wrapping Up
This sourdough sandwich bread has genuinely changed how I think about lunch.
There’s something about slicing into a loaf you made yourself that just hits different. And when you realize how simple the process actually is, it becomes one of those things you just start doing regularly.
Plus, your kitchen will smell absolutely incredible every time you bake it.
If you try this recipe, come back and drop a comment about how it turned out. Did you add any fun mix-ins? Did your family fight over who gets the first slice? (Mine definitely did.)
And if you run into any issues or have questions, leave them in the comments. I’m always happy to help troubleshoot or share what I’ve learned from my own sourdough adventures.
Now go make some bread. Your sandwiches will thank you. 🍞