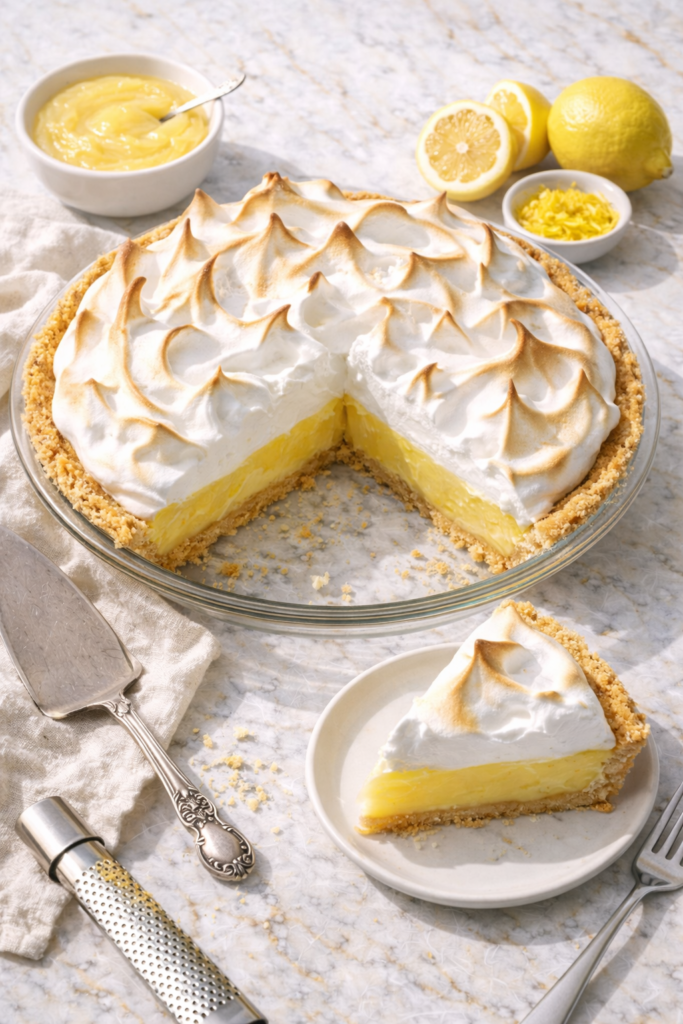
Ever cut into a lemon meringue pie only to watch the filling ooze everywhere like some kind of citrus disaster?
Or worse, bit into that gorgeous fluffy meringue just to find it’s turned into a weepy, sad puddle on your plate?
I’ve been there. Multiple times. And I’m pretty sure I’ve made every possible mistake you can make with this pie.
But here’s what I figured out after way too many failed attempts: lemon meringue pie isn’t hard. It’s just specific. Get the temperatures wrong? Disaster. Skip the cornstarch? Pudding city. Rush the meringue? Prepare for tears (both kinds).
The thing is, when you nail it, this pie is absolutely ridiculous. Tart, creamy filling that cuts clean. Fluffy meringue with those perfect golden peaks. Buttery crust that doesn’t get soggy.
And you don’t need to be a pastry chef to pull it off.
I’m walking you through exactly how to make this pie work. No fancy equipment. No culinary degree. Just a few key techniques that make all the difference.
What You’ll Need
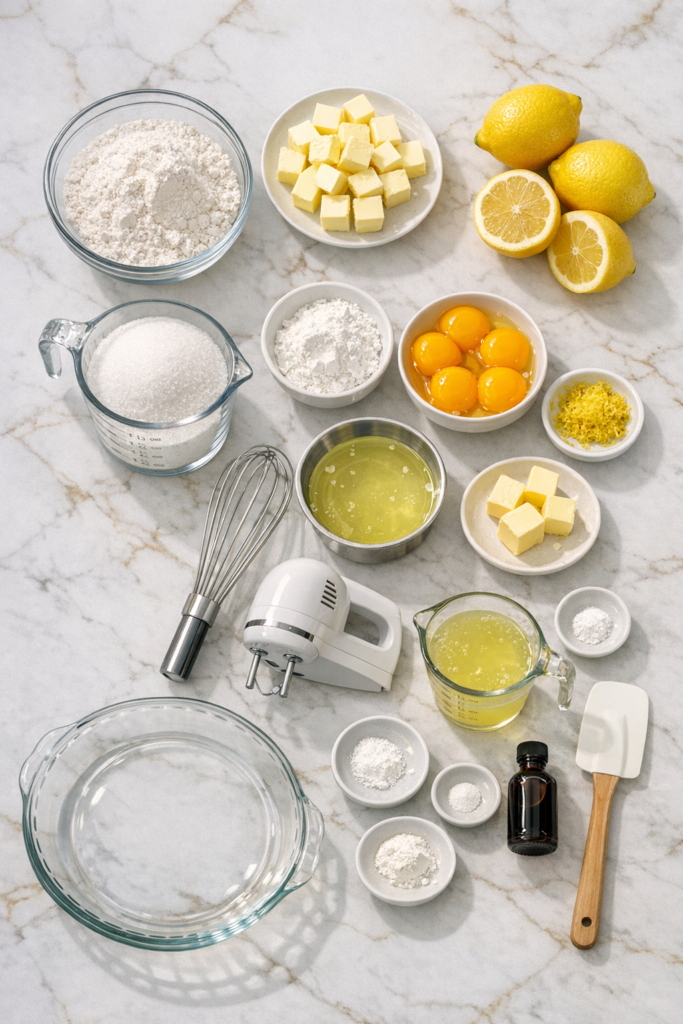
For the Crust:
- 1 ¼ cups all-purpose flour
- ½ teaspoon salt
- ½ cup cold unsalted butter (cut into cubes)
- 3-4 tablespoons ice water
For the Filling:
- 1 ½ cups granulated sugar
- ⅓ cup cornstarch
- ¼ teaspoon salt
- 1 ½ cups water
- 4 large egg yolks (save the whites for meringue!)
- 2 tablespoons unsalted butter
- ⅔ cup fresh lemon juice (about 3-4 lemons)
- 1 tablespoon lemon zest
For the Meringue:
- 4 large egg whites (room temperature)
- ¼ teaspoon cream of tartar
- ½ cup granulated sugar
- ½ teaspoon vanilla extract
Pro Tips
Temperature is everything. Your butter needs to be cold for the crust, your egg whites need to be room temp for the meringue, and your filling needs to be hot when you add the meringue. I know it sounds picky, but these temps are what keep your pie from falling apart.
Fresh lemon juice only. Please don’t use the stuff in a bottle. Fresh lemons have this bright, clean flavor that bottled juice just can’t match. You’ll taste the difference, I promise.
Don’t skip the cream of tartar. This magical powder stabilizes your meringue and keeps it from deflating. Without it, you’re basically playing meringue roulette.
Seal the edges completely. When you spread your meringue, make sure it touches the crust all the way around. Any gaps and you’ll get that annoying shrinkage and weeping situation.
Let it cool properly. I know waiting is torture when your pie looks that good, but if you cut it too soon, the filling won’t have set and you’ll have a mess. Give it at least 3 hours.
Tools You’ll Need
- 9-inch pie dish
- Mixing bowls (at least 3)
- Whisk
- Medium saucepan
- Electric mixer (stand or hand)
- Rubber spatula
- Measuring cups and spoons
- Zester or microplane
- Fork (for pricking the crust)
- Pie weights or dried beans
How to Make It
Make the Crust
Start by mixing your flour and salt in a bowl.
Add those cold butter cubes and work them into the flour with your fingers or a pastry cutter until it looks like coarse sand with some pea-sized chunks. This is what makes your crust flaky.
Drizzle in the ice water one tablespoon at a time, mixing gently. You want the dough to just barely come together. Too much water and you’ll have a tough crust.
Form it into a disk, wrap it in plastic, and chill for at least 30 minutes. This rest time lets the gluten relax so your crust won’t shrink.
Roll out your dough on a floured surface until it’s about 12 inches across. Transfer it to your pie dish, trim the edges, and crimp them however you like.
Prick the bottom all over with a fork. This stops it from puffing up.
Line it with parchment paper and fill it with pie weights or dried beans. Bake at 375°F for 20 minutes, then remove the weights and bake another 10 minutes until golden.
Let it cool completely.
Make the Filling
Whisk together sugar, cornstarch, and salt in your saucepan. Add the water and whisk until smooth.
Cook over medium heat, stirring constantly. This is not the time to check your phone. The mixture will look thin at first, then suddenly start to thicken. Keep stirring until it’s thick and bubbling, about 5-7 minutes.
Whisk your egg yolks in a separate bowl. Slowly add about half a cup of the hot mixture to the yolks while whisking. This tempers them so they don’t scramble.
Pour the yolk mixture back into the saucepan, still whisking. Cook for another 2 minutes until everything’s thick and glossy.
Take it off the heat. Stir in the butter until it melts, then add the lemon juice and zest. The filling will be bright yellow and smell amazing.
Pour it into your cooled crust right away. Press plastic wrap directly onto the surface if you’re not adding the meringue immediately.
Make the Meringue
Make sure your bowl and beaters are completely clean. Any grease and your egg whites won’t whip properly.
Beat the egg whites and cream of tartar on medium speed until foamy.
Gradually add the sugar, about a tablespoon at a time. Don’t dump it all in at once or your meringue will be grainy.
Once all the sugar’s in, crank it to high speed and beat until stiff, glossy peaks form. This takes about 5 minutes. When you lift the beater, the peaks should stand straight up.
Add the vanilla and beat for another 30 seconds.
Assemble and Bake
Your filling needs to be hot when you add the meringue. If it cooled down, warm it gently in a 350°F oven for 10 minutes.
Dollop the meringue onto the hot filling. Use your spatula to spread it out, making sure it touches the crust all the way around. This seal is crucial.
Create peaks and swirls with the back of your spoon. Get creative here.
Bake at 350°F for 12-15 minutes until the meringue is golden brown. Watch it closely because meringue can go from perfect to burnt fast.
Let it cool on a wire rack for 1 hour, then refrigerate for at least 2 more hours before slicing.
Substitutions and Variations
No fresh lemons? You can use bottled juice in a pinch, but reduce the amount by about 2 tablespoons because it’s more concentrated.
Gluten-free crust: Swap the all-purpose flour with your favorite gluten-free blend. The texture will be slightly different but still good.
Graham cracker crust: Not in the mood for homemade pastry? Use a pre-made graham cracker crust. It’s not traditional, but it’s delicious and saves time.
Lime meringue pie: Replace the lemons with limes for a different twist. You’ll need about 5-6 limes.
Meyer lemon version: If you can find Meyer lemons, use them. They’re sweeter and less acidic, so you might want to reduce the sugar by 2-3 tablespoons.
Swiss meringue: For an even more stable meringue, try the Swiss method where you heat the egg whites and sugar together before whipping. It takes longer but weeps less.
Make Ahead Tips
You can make the crust up to 2 days ahead. Keep it wrapped in the fridge, or freeze it for up to 3 months.
The filling can also be made a day ahead. Just press plastic wrap onto the surface and refrigerate. Reheat it gently before adding the meringue.
Don’t make the meringue ahead. It needs to go on fresh and be baked right away for the best texture.
The fully assembled pie is best eaten within 24 hours, but it’ll keep for up to 3 days in the fridge.
Nutritional Information
Per slice (based on 8 servings):
- Calories: 385
- Fat: 14g
- Carbohydrates: 62g
- Protein: 5g
- Sugar: 45g
- Fiber: 1g
- Sodium: 210mg
Keep in mind this is a dessert, not a health food. 😊
Pairing Suggestions
This pie is rich and tangy, so you want something to balance it.
Coffee works perfectly. The bitterness cuts through the sweetness.
A light herbal tea like chamomile or mint is also great.
If you’re serving it after dinner, consider a lighter meal beforehand. Something like grilled fish or a simple roasted chicken. You don’t want people too full to enjoy this.
For a summer gathering, pair it with fresh berries on the side.
Leftovers and Storage
Store any leftover pie in the fridge, loosely covered with plastic wrap or in a pie carrier.
The meringue might weep a little after a day, but the pie is still totally edible.
Don’t freeze this pie. The meringue turns into a weird texture and the filling separates. Just make a smaller pie if you’re worried about leftovers.
Slices are great straight from the fridge. Some people actually prefer it cold.
FAQ
Why is my meringue weeping? This usually happens when the filling wasn’t hot enough when you added the meringue, or if you didn’t seal the edges to the crust. The meringue needs that heat to start cooking from the bottom up.
Can I use a store-bought crust? Absolutely. I won’t tell anyone. Just make sure it’s pre-baked according to the package directions before adding your filling.
My filling is too runny. What happened? You probably didn’t cook it long enough, or you didn’t use enough cornstarch. Make sure it reaches a full boil and thickens properly before taking it off the heat.
Can I make this without a mixer? You can whip the meringue by hand with a whisk, but your arm will hate you. It takes about 10-15 minutes of serious whisking to get stiff peaks.
How do I know when the meringue is done baking? The peaks should be golden brown and the meringue should feel dry to the touch. If you tap it lightly, it should feel firm, not squishy.
Why did my crust shrink? This happens when the dough is overworked or didn’t rest long enough. Always chill your dough and don’t skip the resting time.
Can I make mini pies instead? Yes! Use a muffin tin with foil or paper liners. You’ll need to adjust the baking times down to about 8-10 minutes for the crust and 6-8 minutes for the meringue.
What’s the white liquid under my meringue? That’s weeping, and it happens when the sugar doesn’t fully dissolve or when there’s too much moisture. Using superfine sugar can help prevent this.
Wrapping Up
So there you have it. Lemon meringue pie that actually holds together and tastes like something from a fancy bakery.
Is it a bit of work? Sure. But most of that is just waiting for things to chill or bake. The actual hands-on time is pretty manageable.
And when you slice into it and see those clean layers? When you take that first bite and get the perfect combo of tart filling, fluffy meringue, and buttery crust? Totally worth it.
Try it this weekend. Let the filling cool properly. Don’t rush the meringue. And definitely don’t skip the cream of tartar.
Then come back and tell me how it went! Did your meringue turn out perfect? Did you make any fun variations? Drop a comment below. I read every single one and I love hearing about your baking adventures.