Can you actually make a birthday cake from scratch that rivals the bakery version?
I’m talking about the kind with sky-high layers, pillowy soft crumb, and frosting so good you’ll lick the spatula clean.
Spoiler: yes, and it’s easier than you think.
Boxed mixes are fine when you’re in a pinch, but there’s a different feeling when you pull a homemade birthday cake out of the oven. It fills your kitchen with vanilla and butter, and when you take that first bite, you’ll taste the difference.
I started making birthday cakes from scratch a few years back when I got tired of dry grocery store cakes that tasted like sugar and regret. Now? This is my go-to recipe for every celebration. Birthdays, random Tuesdays, “I survived this week” cakes… you name it.
This recipe makes a classic vanilla layer cake that’s moist, fluffy, and pairs perfectly with whatever frosting your heart desires. I’m walking you through every single step so you can nail it on your first try.
Let’s get into it.
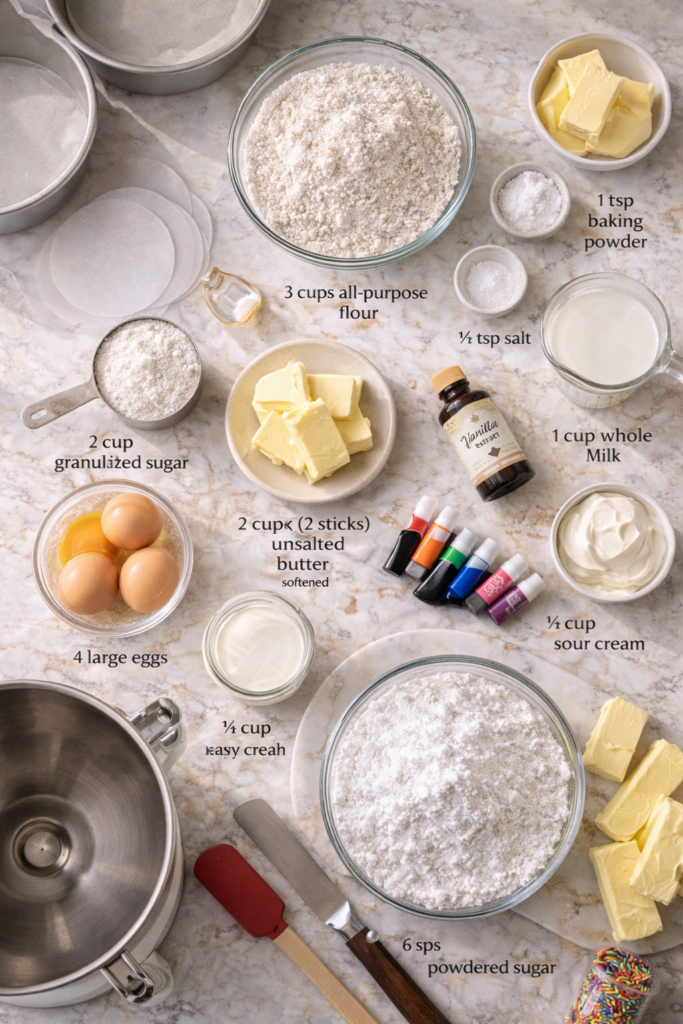
What You’ll Need
For the Cake:
- 3 cups all-purpose flour
- 1 tablespoon baking powder
- ½ teaspoon salt
- 1 cup unsalted butter (2 sticks), softened to room temperature
- 2 cups granulated sugar
- 4 large eggs, room temperature
- 2 teaspoons pure vanilla extract
- 1 cup whole milk, room temperature
- ½ cup sour cream, room temperature
For the Buttercream Frosting:
- 1½ cups unsalted butter (3 sticks), softened
- 6 cups powdered sugar, sifted
- ⅓ cup heavy cream
- 2 teaspoons pure vanilla extract
- ¼ teaspoon salt
- Food coloring (optional)
For Decorating:
- Sprinkles (rainbow, chocolate, or whatever you love)
- Fresh flowers (make sure they’re food-safe)
- Candles
Tools You’ll Need
You don’t need a fancy kitchen to pull this off, but here’s what will make your life easier:
- Three 9-inch round cake pans
- Parchment paper
- Stand mixer or hand mixer
- Rubber spatula
- Cooling racks
- Offset spatula (for frosting)
- Cake leveler or serrated knife
- Piping bags and tips (optional, for decoration)
- Turntable (makes frosting so much easier, but not required)
Pro Tips
1. Room temperature ingredients are your best friend. Cold butter, eggs, and milk won’t mix properly and you’ll end up with a dense cake. I set everything out about an hour before I start baking.
2. Don’t overmix the batter. Once you add the flour, mix just until you don’t see any more dry streaks. Overmixing develops gluten and makes your cake tough instead of tender.
3. Use an oven thermometer. Most home ovens run hot or cold. I learned this the hard way after burning three batches of cookies. An oven thermometer will save you from heartbreak.
4. Let the cakes cool completely before frosting. I know it’s tempting to slap frosting on a warm cake, but it will melt into a puddle. Patience pays off here.
5. Crumb coat first. Spread a thin layer of frosting over the entire cake to trap all the crumbs, then chill for 30 minutes. Your final coat will be smooth and clean.
Substitutions and Variations

Buttermilk instead of sour cream: Use 1 cup of buttermilk and skip the sour cream. The cake will still be moist and delicious.
Different flavors: Swap vanilla extract for almond, lemon, or coconut extract to change up the flavor profile.
Chocolate birthday cake: Replace 1 cup of flour with ¾ cup cocoa powder and add an extra ½ cup of milk.
Dairy-free: Use coconut milk and vegan butter. The texture won’t be exactly the same, but it’ll still taste great.
Less sugar in the frosting: Cut the powdered sugar down to 4 cups if you prefer a less sweet frosting. It’ll be softer but still spreadable.
Make Ahead Tips
Life gets crazy before birthdays. Here’s how to prep ahead:
Bake the cake layers: Wrap cooled layers tightly in plastic wrap and store at room temperature for up to 2 days, or freeze for up to 3 months. Thaw in the fridge overnight before assembling.
Make the frosting: Buttercream can be made 3 days ahead. Store it in an airtight container in the fridge, then bring to room temperature and re-whip before using.
Assemble the cake: A fully assembled and frosted cake can be refrigerated for up to 3 days. Just bring it to room temperature 1-2 hours before serving so the frosting softens.
How to Make This Birthday Cake
Step 1: Prep Your Pans
Preheat your oven to 350°F.
Grease three 9-inch round cake pans with butter or cooking spray, then line the bottoms with parchment paper. This double protection means your cakes will slide right out without sticking.
Step 2: Mix the Dry Ingredients
In a medium bowl, whisk together the flour, baking powder, and salt. Set this aside.
Step 3: Cream the Butter and Sugar
In a large bowl (or your stand mixer), beat the softened butter and sugar together on medium-high speed for about 4 minutes. You want it light, fluffy, and pale yellow.
This step is where you’re incorporating air into the batter, which makes your cake rise beautifully.
Step 4: Add the Eggs and Vanilla
Add the eggs one at a time, beating well after each addition. Scrape down the sides of the bowl between eggs so everything mixes evenly.
Mix in the vanilla extract.
Step 5: Alternate Adding Dry and Wet Ingredients
With your mixer on low speed, add about ⅓ of the flour mixture. Mix until just combined.
Add half of the milk and mix again.
Repeat with another ⅓ of flour, the rest of the milk, and finish with the last of the flour.
Finally, fold in the sour cream with a rubber spatula. The batter should be thick, smooth, and smell like heaven.
Step 6: Bake
Divide the batter evenly among your three prepared pans. I use a kitchen scale to make sure each layer is the same size, but eyeballing works too.
Bake for 25-30 minutes, or until a toothpick inserted in the center comes out clean and the tops spring back when you touch them.
Let the cakes cool in the pans for 10 minutes, then turn them out onto cooling racks. Peel off the parchment and let them cool completely.
This is the hardest part. Waiting. But trust me, warm cake plus frosting equals disaster.
Step 7: Make the Buttercream
Beat the softened butter on medium speed until creamy, about 2 minutes.
Turn the mixer to low and gradually add the powdered sugar, 1 cup at a time. Once it’s all added, turn the speed back up to medium and beat for 3 minutes.
Add the heavy cream, vanilla, and salt. Beat on high for another 2 minutes until the frosting is light and fluffy.
If you want colored frosting, add gel food coloring now and mix until the color is even.
Step 8: Level the Cakes
If your cakes have domed tops (mine always do), use a cake leveler or serrated knife to slice off the tops so they’re flat. This makes stacking way easier.
Step 9: Assemble the Cake
Place your first layer on a cake stand or serving plate. Spread about 1 cup of frosting on top, all the way to the edges.
Add the second layer and repeat with another cup of frosting.
Top with the third layer.
Step 10: Crumb Coat
Spread a thin layer of frosting over the entire cake. It doesn’t need to look perfect. This is just to seal in the crumbs.
Pop the cake in the fridge for 30 minutes.
Step 11: Final Frosting
Once the crumb coat is set, spread the remaining frosting over the top and sides of the cake. Use an offset spatula to smooth it out, or go for a rustic, textured look.
If you want to get fancy, use a piping bag with a star tip to pipe rosettes or borders.
Step 12: Decorate
Add your sprinkles, fresh flowers, or whatever makes you happy. Stick in the candles.
Stand back and admire your work because you just made a birthday cake from scratch.
Leftovers and Storage
Room temperature: If you’re eating the cake within 2 days, you can keep it covered on the counter. The buttercream acts as a preservative.
Refrigerator: Store in an airtight container or cover with plastic wrap for up to 5 days. Let it sit at room temperature for an hour before serving so the frosting softens.
Freezer: Wrap individual slices in plastic wrap and then foil. Freeze for up to 3 months. Thaw in the fridge overnight.
Leftover cake also makes an excellent breakfast. I won’t judge.
Nutritional Information (Per Slice, Based on 12 Slices)
- Calories: 720
- Fat: 36g
- Saturated Fat: 22g
- Carbohydrates: 95g
- Sugar: 75g
- Protein: 6g
- Sodium: 280mg
(Keep in mind this is birthday cake. It’s not supposed to be a health food, and that’s okay.)
What to Serve With This Cake
Ice cream: Vanilla, chocolate, or strawberry all work beautifully.
Fresh berries: Strawberries, raspberries, or blueberries add a fresh contrast to the rich frosting.
Coffee or milk: Classic pairings for a reason.
Whipped cream: If you want to go full dessert mode, add a dollop on the side.
FAQ
Can I make this cake in different pan sizes? Yes! Use two 8-inch pans for taller layers (bake for 30-35 minutes), or one 9×13 sheet pan (bake for 35-40 minutes).
Why did my cake sink in the middle? This usually happens if the oven temperature is too low or if you open the oven door too early. Make sure your oven is fully preheated and resist the urge to peek for the first 20 minutes.
Can I use salted butter instead of unsalted? You can, but skip the added salt in the recipe. I prefer unsalted because it gives you more control over the flavor.
How do I know when the cake is done? Insert a toothpick into the center. It should come out clean or with just a few moist crumbs. The top should also spring back when you touch it lightly.
Can I make cupcakes instead? Absolutely. Fill cupcake liners about ⅔ full and bake at 350°F for 18-22 minutes. This recipe makes about 36 cupcakes.
What if I don’t have sour cream? Use Greek yogurt instead. It works the same way and adds moisture to the cake.
My frosting is too soft. What do I do? Pop it in the fridge for 15-20 minutes to firm up. If it’s still too soft, beat in an extra ½ cup of powdered sugar.
Can I flavor the frosting differently? Yes! Try adding 2 tablespoons of cocoa powder for chocolate frosting, or swap the vanilla for almond or lemon extract.
Wrapping Up
Homemade birthday cake hits different.
It’s the kind of thing that makes people stop mid-bite and say, “Wait, you made this?” And you get to casually nod like it’s no big deal, even though you’re screaming with pride on the inside.
This recipe is forgiving, customizable, and honestly just fun to make. The first time I baked it, I was nervous about the layers being even and the frosting looking decent. By the third time? I was adding sprinkles with one hand and taking photos with the other.
So grab your ingredients, crank up some music, and get baking. 🎂
When you make this cake, come back and leave a comment. I want to hear how it turned out, what flavor you used, and if you ended up eating frosting straight from the bowl. (No shame. We’ve all been there.)