You know exactly which ones I’m talking about.
The ones that are way past eating raw. Completely black. Soft enough that you cringe a little when you pick them up.
Most people toss them. Or freeze them with completely sincere intentions, then forget they exist for four months.
Here’s what nobody tells you: the blacker the banana, the better the bake. The natural sugars have had time to fully develop, which means you’re working with fruit that’s basically pre-sweetened. And when you pair that with brown butter instead of regular melted butter? You get a banana bread with a depth of flavor that makes people stop mid-bite and ask what you did differently.
Spoiler: you just browned the butter. Takes five extra minutes. Changes everything.
This isn’t a complicated recipe. It’s genuinely one of the easiest things you can make, and it never gets old. Make it once and it’ll become the recipe you reach for every single time you see bananas going dark on your counter.

What You’ll Need
For the banana bread:
- 3 very ripe bananas (the blacker, the better), about 1.5 cups mashed
- 1/2 cup (113g) unsalted butter
- 3/4 cup (150g) light brown sugar, packed
- 2 large eggs, room temperature
- 1 tsp pure vanilla extract
- 1 1/2 cups (190g) all-purpose flour
- 1 tsp baking soda
- 1/2 tsp fine sea salt
- 1/2 tsp ground cinnamon
- 1/2 cup (55g) chopped walnuts or semi-sweet chocolate chips (optional, but highly recommended)
Tools You’ll Need
- 9×5 inch loaf pan
- Medium saucepan (for browning the butter)
- Large mixing bowl
- Fork or potato masher
- Rubber spatula
- Wire cooling rack
- Toothpick or skewer (for testing doneness)
- Parchment paper or cooking spray
Pro Tips
These are the things nobody tells you the first time:
1. Don’t skip the browning step. It sounds optional. It is not. Brown butter adds a nutty, almost toffee-like flavor that you genuinely cannot replicate any other way. Watch it closely because it goes from golden to burnt fast.
2. Don’t overmix the batter. Fold the dry ingredients in until just combined. A few streaks of flour are fine. Overmixing activates the gluten and gives you a dense, tough loaf instead of a soft, tender one.
3. Cover with foil at the 40-minute mark. If your top is browning too fast before the center is cooked through, tent it loosely with foil. Keeps the color nice without losing moisture.
4. Cool it fully before slicing. This is genuinely hard to do. But cutting into it too early lets all the steam escape and the texture suffers. Give it at least 30 minutes on the wire rack.
5. Use a dark loaf pan for better crust. Dark pans absorb more heat and give you that gorgeous, slightly caramelized outer edge. If you only have a light-colored pan, add 5-10 minutes to your bake time.
Substitutions and Variations
The recipe is flexible in all the right ways:
- Butter: Swap for coconut oil (same amount) for a dairy-free version. You won’t get the browned butter flavor but it’s still delicious.
- All-purpose flour: Works fine with 1:1 gluten-free flour blend for a GF version. Bob’s Red Mill is a reliable option.
- Sugar: Brown sugar is ideal here, but white granulated sugar works too. Coconut sugar gives a slightly more caramel-ish depth.
- Eggs: Flax eggs (1 tbsp ground flaxseed + 3 tbsp water per egg, rested 5 minutes) work well for a vegan version.
- Mix-ins: Chocolate chips, walnuts, pecans, dried cranberries, a swirl of peanut butter, a tablespoon of espresso powder. It handles additions well.
- Muffin version: Same batter poured into a lined muffin tin. Bake at 350°F for 20-23 minutes. Easier to portion, easier to share.
Make Ahead Tips
This bread actually gets better on day two. The flavors settle and deepen overnight.
Bake it the day before you need it, let it cool completely, wrap it tightly in plastic wrap or store in an airtight container at room temperature. It stays fresh and moist for up to three days this way.
If you want to prep even further ahead, mash and freeze your ripe bananas in a zip-lock bag. Thaw overnight in the fridge when you’re ready to use them. The texture is perfect for baking.
A Few Extra Details Worth Knowing
Nutritional snapshot (per slice, based on 10 slices, no mix-ins):
| Nutrient | Approx. Amount |
|---|---|
| Calories | ~220 kcal |
| Carbohydrates | ~30g |
| Fat | ~10g |
| Protein | ~3g |
| Fiber | ~1g |
| Sugar | ~16g |
For different diets:
- Vegan: Use flax eggs + coconut oil
- Gluten-free: Use 1:1 GF flour blend
- Lower sugar: Reduce to 1/2 cup sugar and add a mashed extra banana for natural sweetness
Meal pairing ideas:
- A slice with your morning coffee is genuinely hard to beat ☕
- Warmed and spread with almond butter for an afternoon snack
- Served slightly warm with a scoop of vanilla ice cream for dessert (yes, it works)
Time efficiency tip: While the loaf is baking, prep your toppings, clean up the kitchen, and have nothing to do by the time it’s done. Hands-on time is under 20 minutes total.
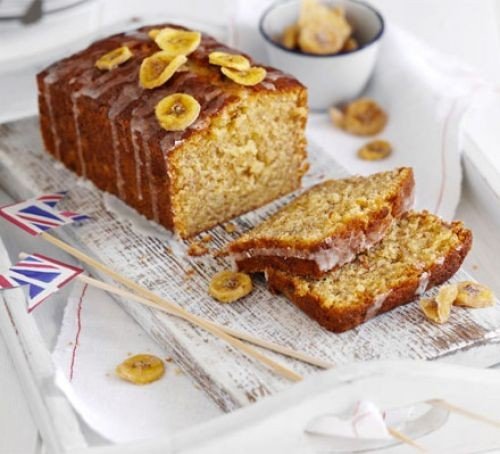
How to Make Brown Butter Banana Bread
Prep time: 15 minutes | Bake time: 55-65 minutes | Total time: ~80 minutes | Serves: 10 slices
- Preheat your oven to 350°F (175°C). Grease your 9×5 loaf pan and line with parchment, leaving a slight overhang on the sides for easy lifting.
- Brown the butter: Melt butter in a medium saucepan over medium heat, stirring occasionally. Keep going past the foam stage until the butter turns golden amber and smells nutty, about 5-7 minutes. Pour into your mixing bowl immediately and let it cool for 5 minutes.
- Mash your bananas directly in the mixing bowl with the browned butter. Use a fork and go until mostly smooth – a few small lumps are totally fine.
- Add the wet ingredients: Whisk in the brown sugar, eggs, and vanilla until well combined.
- Add the dry ingredients: Sprinkle the flour, baking soda, salt, and cinnamon right over the wet mixture. Fold gently with a rubber spatula until just combined. Stop the moment you don’t see dry flour streaks.
- Fold in your mix-ins if you’re using them.
- Pour the batter into your prepared loaf pan and smooth the top with a spatula.
- Bake for 55-65 minutes. At the 40-minute mark, check on it – if the top is getting dark, tent it loosely with foil. It’s done when a toothpick inserted in the center comes out clean or with a few moist crumbs.
- Cool in the pan for 10 minutes, then lift out using the parchment overhang and transfer to a wire rack. Let it cool for at least another 20-30 minutes before slicing.
Leftovers and Storage
Room temperature: Wrap tightly in plastic wrap or store in an airtight container. Keeps well for 3 days.
Refrigerator: Up to 6 days. Bring slices to room temperature or warm briefly in a microwave (about 15-20 seconds) before eating.
Freezer: This bread freezes beautifully. Slice the whole loaf, wrap individual slices in plastic wrap, and store in a zip-lock bag. Freeze for up to 3 months. Pull out a slice the night before you need it.
Reheating: A quick 20 seconds in the microwave brings it right back to fresh. A dry skillet over low heat for 1-2 minutes per side gives you slightly crispy edges that are unexpectedly good.
FAQ
Can I use frozen bananas?
Yes, and they actually work great. Thaw them completely and drain off any excess liquid before mashing. They’re usually softer and easier to mash than fresh.
My bread sank in the middle. What happened?
A few things can cause this: underbaking (pull out the toothpick test before deciding it’s done), overmixing the batter, or opening the oven door too early. Let the bread bake undisturbed for at least the first 40 minutes.
Can I double the recipe?
Yes. Use two loaf pans side by side rather than one large pan, and expect the same bake time. Rotating the pans halfway through is a good idea for even browning.
My bananas aren’t ripe enough. Can I speed up the process?
Two options: Put unpeeled bananas on a baking sheet in a 300°F oven for 15-20 minutes until the skins turn black. Or microwave peeled bananas for 30-second intervals until soft. Neither gives you quite the same sweetness as naturally ripened bananas, but both work in a pinch.
Do I have to use brown sugar?
No. White sugar works fine. Brown sugar adds a subtle molasses note that plays really nicely with the bananas and browned butter, so it’s worth using if you have it.
Can I add a streusel topping?
Absolutely. Mix 3 tbsp flour, 3 tbsp brown sugar, 2 tbsp cold butter, and a pinch of cinnamon until crumbly. Sprinkle on top before baking. It makes the loaf look and feel extra special with very little effort.
Wrapping Up
There’s something genuinely satisfying about turning something that looks basically past saving into one of the best things you’ve baked all month.
That’s exactly what this recipe does.
If you’ve been letting ripe bananas go to waste or freezing them indefinitely, this is your sign to actually use them. The brown butter step is five extra minutes that makes a real difference – don’t skip it 😉
Once you make it, come back and leave a comment below. Tell me what mix-ins you used, how it turned out, or any questions you have. I read every single one.